")
")
")
")
")
")

")
CMSes
We maintain systems for content management Joomla and WordPress hosting plans Axfone SINGLE. Of course, it is also possible to use other systems, however, this is aware of the hosting specification.
Parameters:
PHP: 5.3.6
MySQL: 5.1.56
php_memory_limit: 128MB
Разширение: modrewrite, gd, suexec, simpleXML, gettext, zip, bz2, exif, xpm, freetype, pdo, curl, json, mysqli, session, soap, tidy
Are the functions fopen, curl served?
php_flag allow_url_fopen on

php_flag allow_url_include on
The security reasons are off by default, but you can ask to be activated. The condition for this is the hosting plan Axfone Bronze or higher, and hosting new server (ISPC3). Email us at This email address is being protected from spambots. You need JavaScript enabled to view it.
Systems for content management - Guidelines for installations
Joomla
Preparing to install a system for content management
First, you must install package management system content on your site. Joomla installation package can be downloaded for example from www.joomla.pl.
Moreover, you should prepare a system for management of data content and create a login. Our customers have the opportunity to create their own databases - in address admin.waszadomena.xy.
After placing the installation package go to your website where you can install the Management System content. In our example this is done from this page demo.axfone.eu
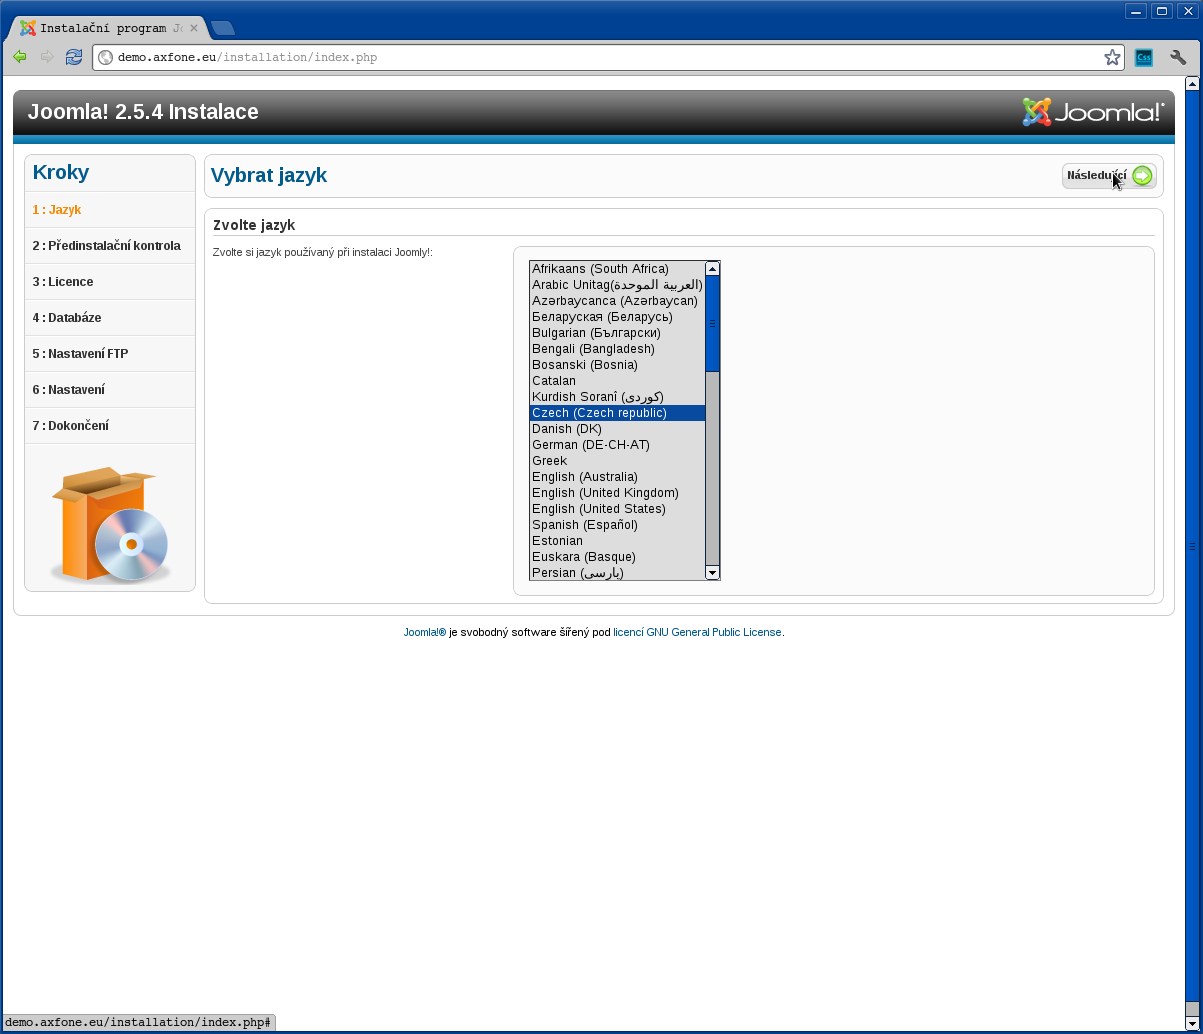
At the initial step of the installation, you must select the installation language. After it is chosen click "Next" to continue the installation.
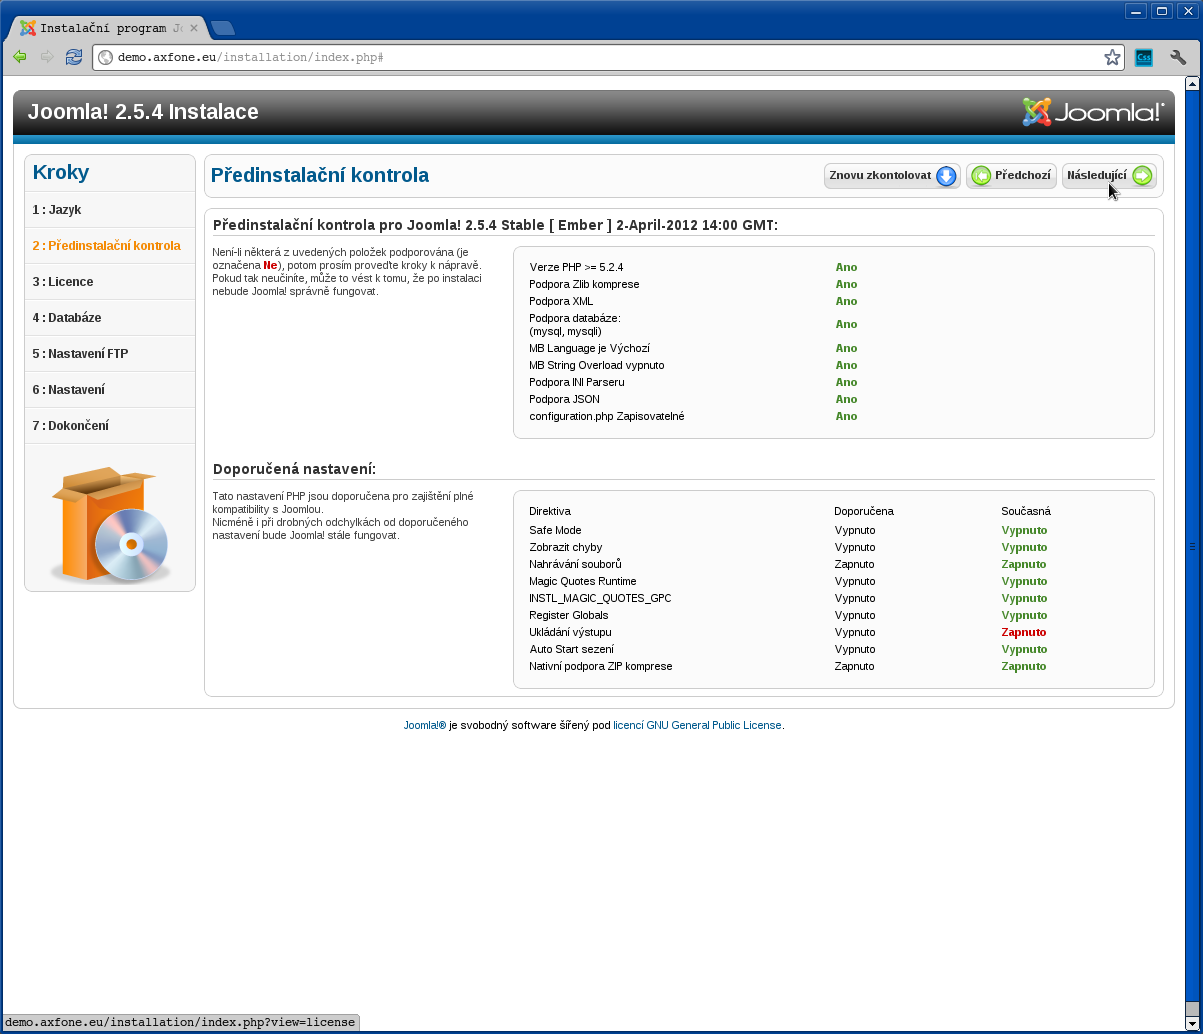
In this step, the installer performs control functions which are available for the installation of CMS. If everything is correct press "Next".
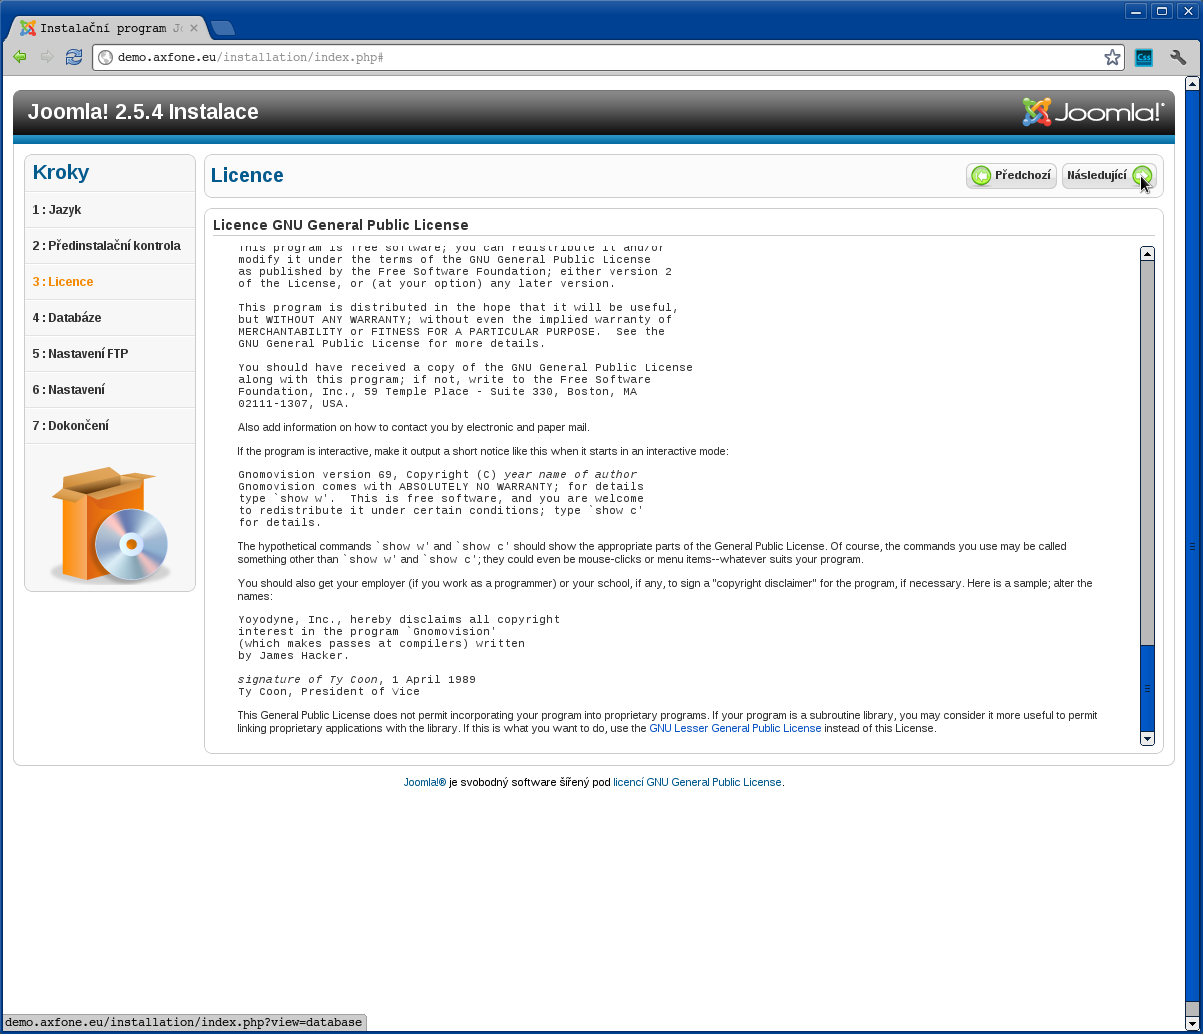
Before you start the installation we recommend you read the license agreement, which the system offers. After reading it, you can continue with the installation by pressing "Next".
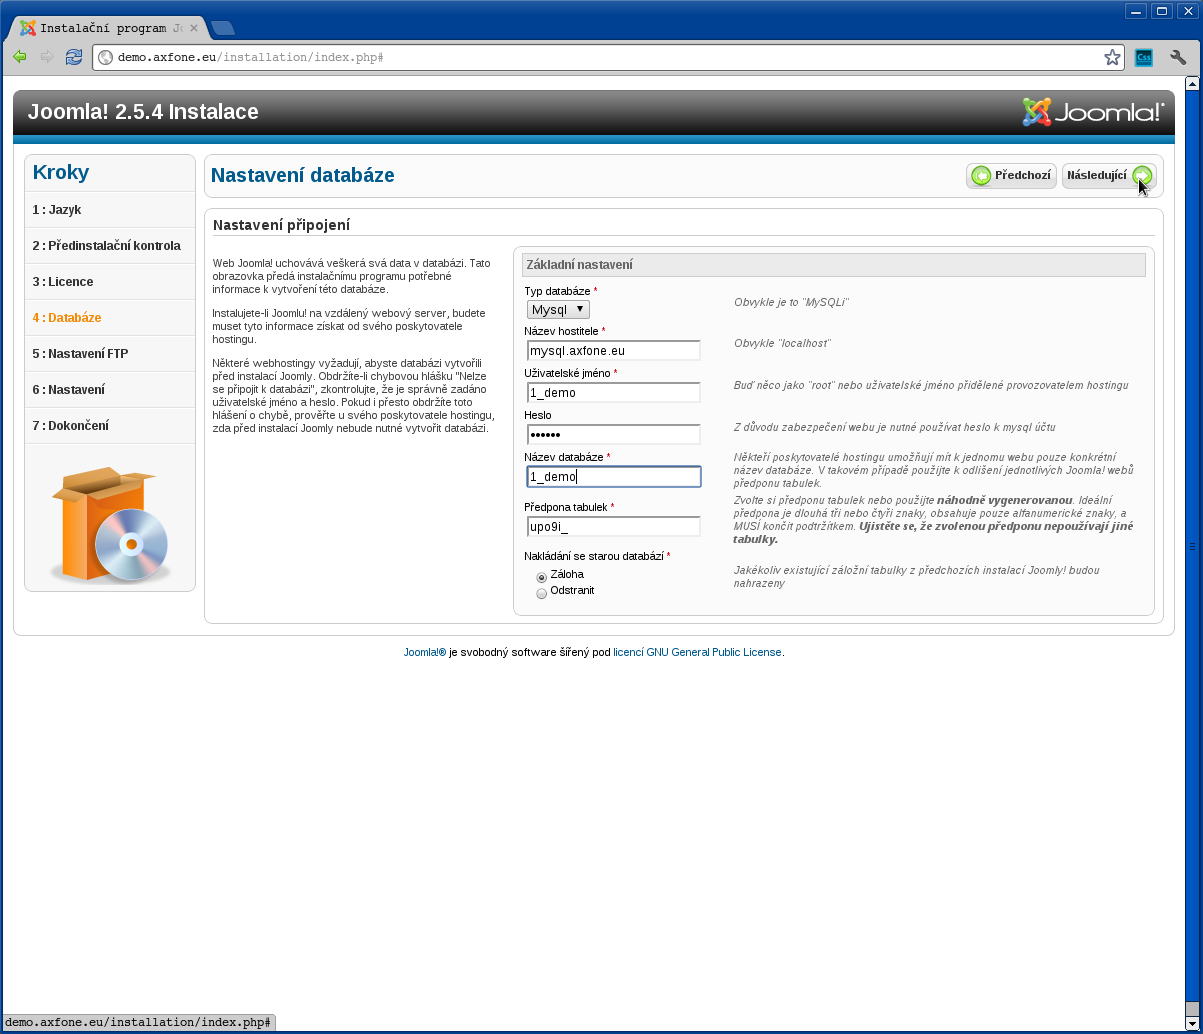
Now you need to fill in all the information needed to establish a connection to the database, which will store data from system content management. Our clients receive the necessary interface information in the application of their web host.
Fill out this way:
Data type: Mysql
( applies to clients of webhosting services)
Host name: mysql.axfone.eu
( applicable in our installation )
Username: 1_demo
( applicable in our installation )
Password: *****
Database names: 1_demo
Table prefix: leave the default value
Import previous version: leave the default value
After completing all the necessary data, click "Next" to move to the next step of the installation.

At this stage, the system content management provides internal management of plug configurations for FTP login.
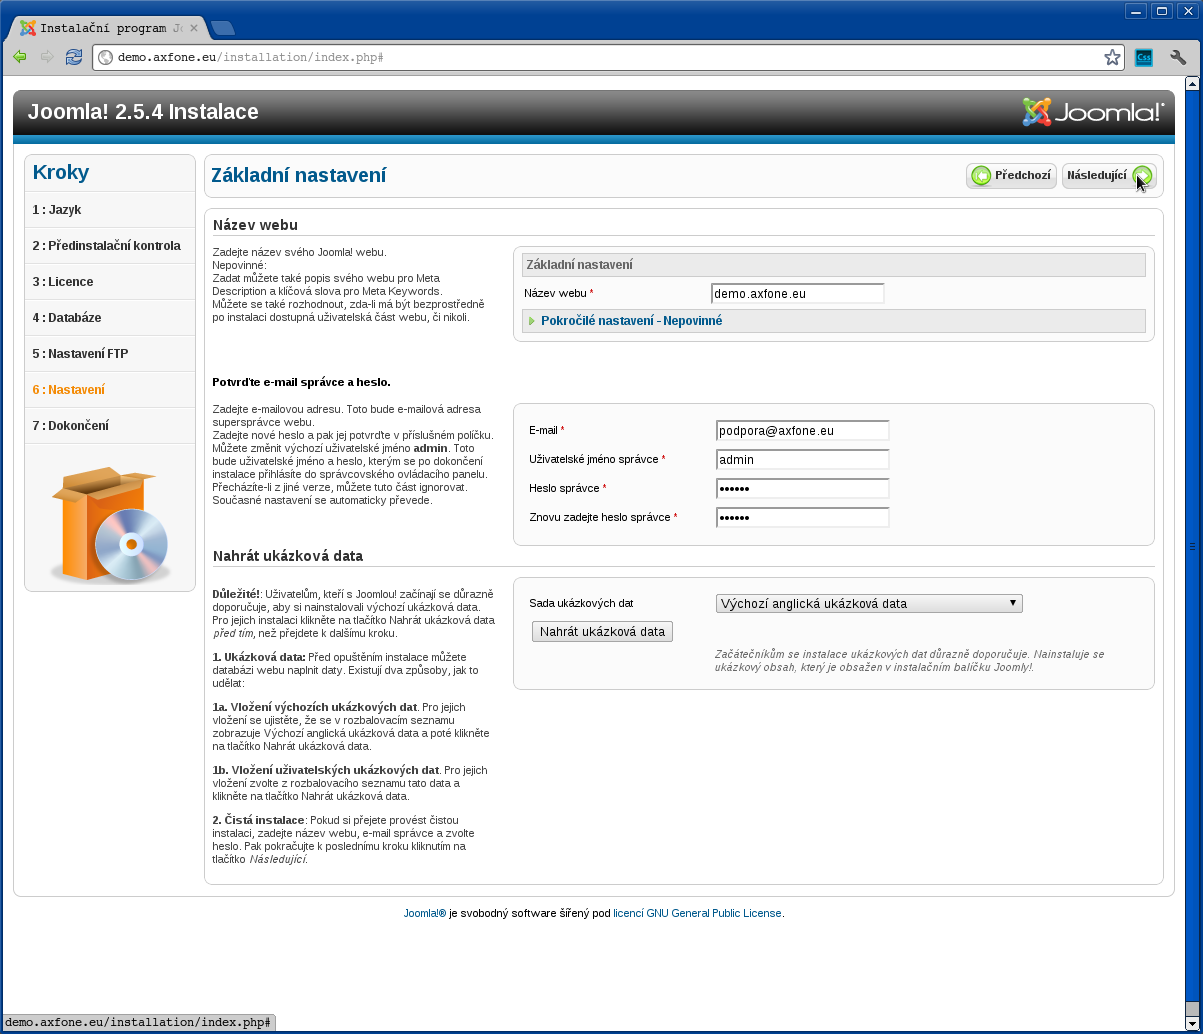
Once the installer completes the necessary information required for the operation and management system for content management, you need to:
Fill them up in the following way:
Site Name: demo.axfone.eu
( applicable in our installation )
E-mail address: This email address is being protected from spambots. You need JavaScript enabled to view it.
( applicable in our installation )
Username: admin
( for the example instalation )
Password: *****
( choose a password of admin account Content Management)
Click "Load Sample Data", you can install a system for content management by filling in data in English. We recommend that if you are a user who installed such a system for the first time, then this will help you understand the capabilities of the system for content management.
To continue with the installation, click "Next".
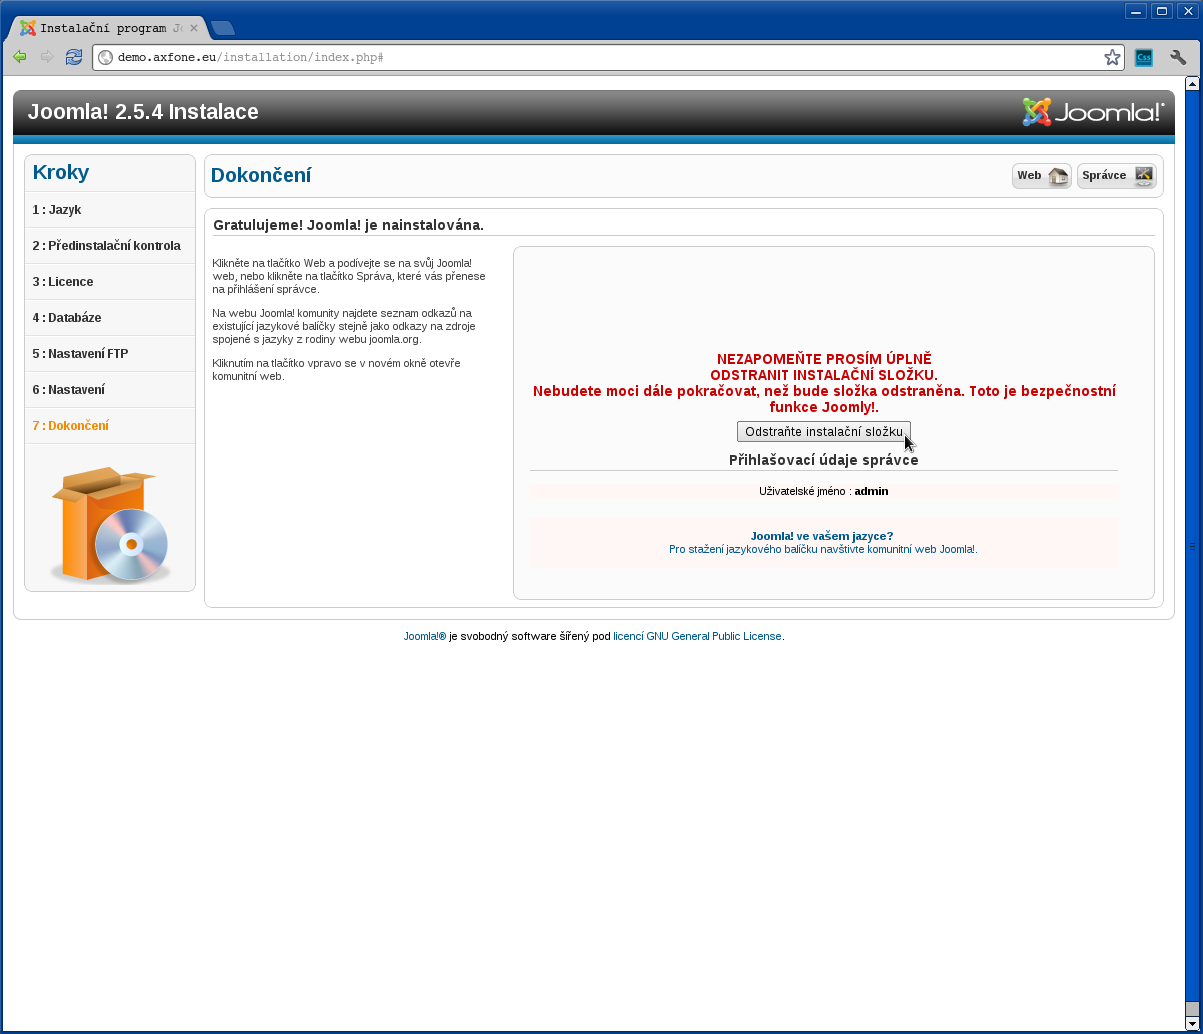
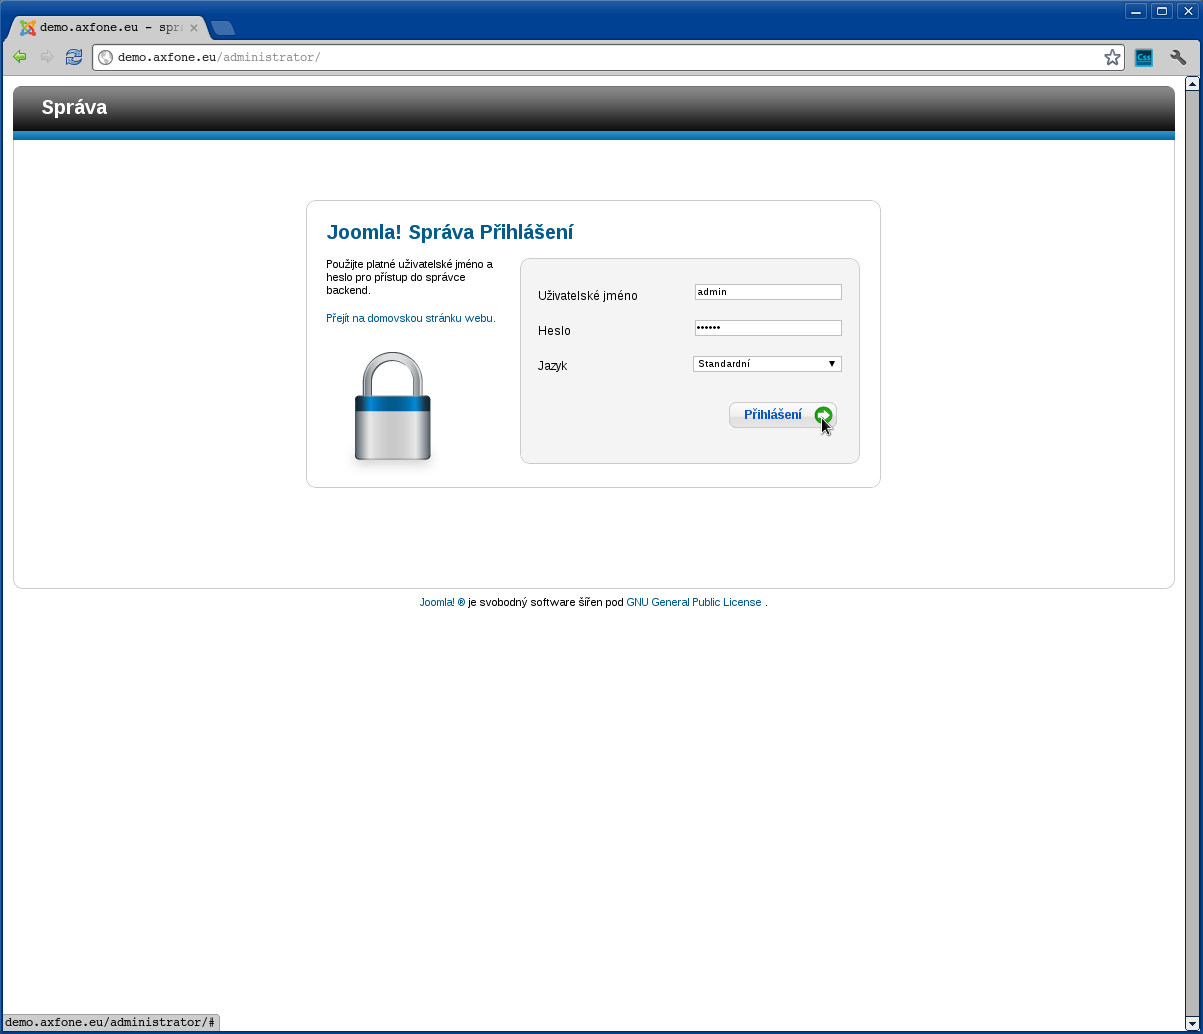
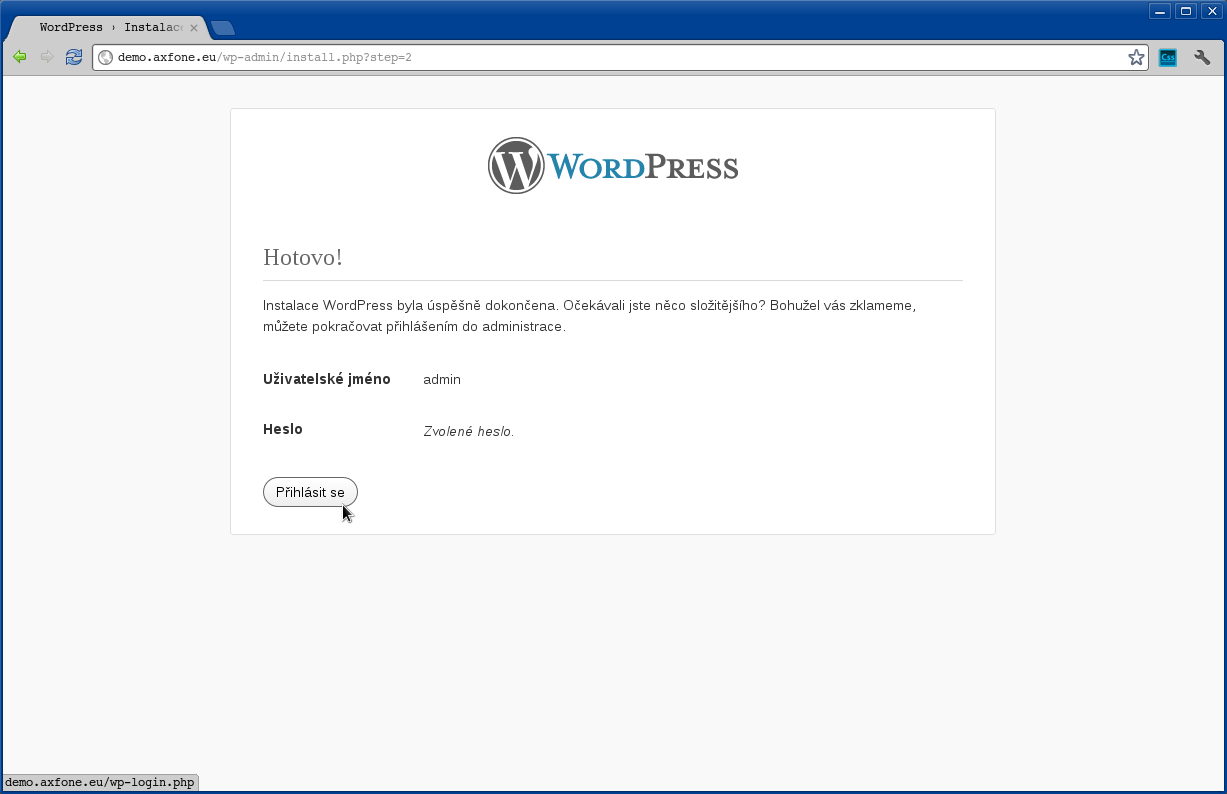
Now the system installation is completed successfully. Now you can log in to space their editorial system. The application can be found on www.waszadomena.xy / administrator, and in our case at demo.axfone.eu / administrator.
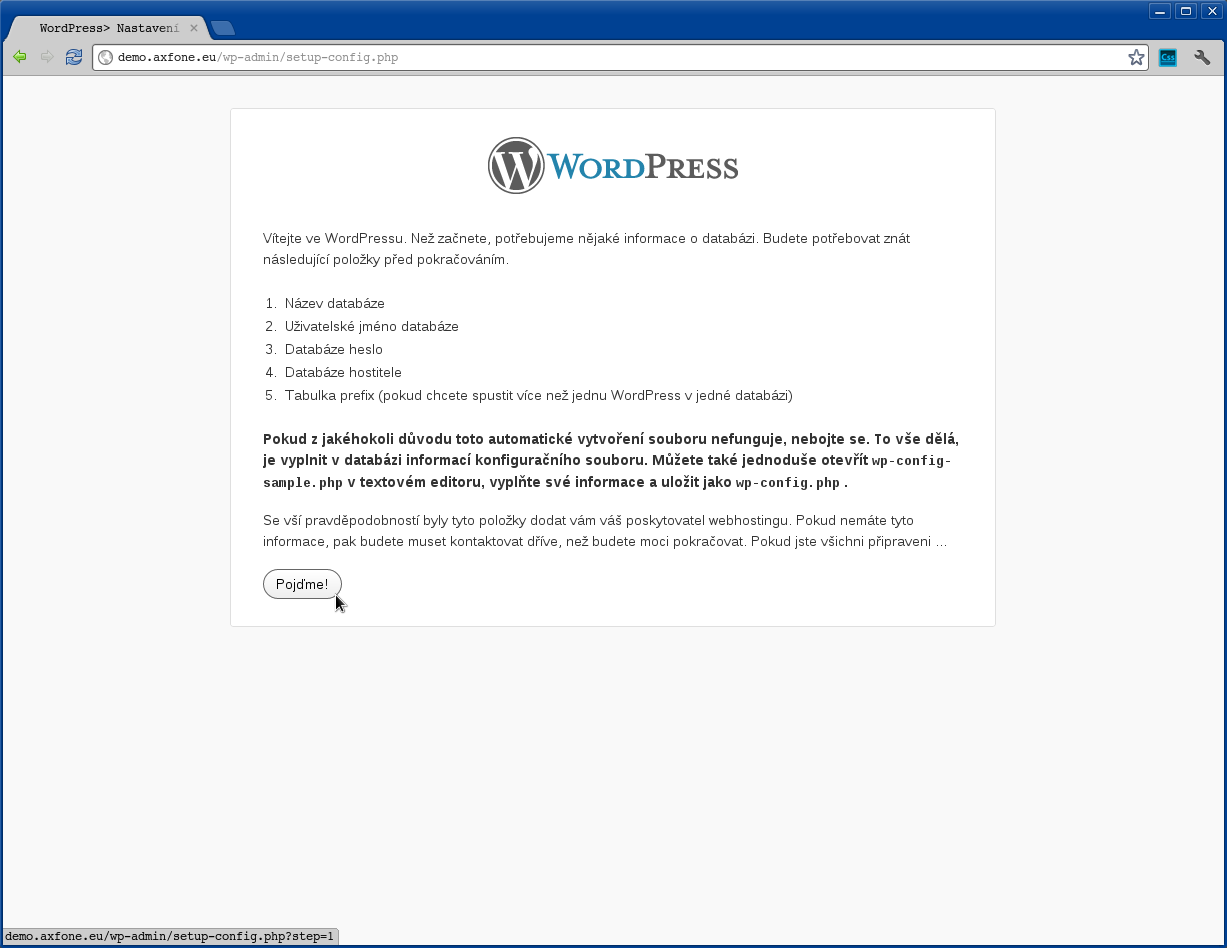
Wordpress
Preparing to install a system for content management.
First, you must install a package management system content on your site. Wordpress installation package can be downloaded for example from http://pl.wordpress.org/.http://cs.wordpress.org/.
Also, they must provide login system for content management. Our customers have the opportunity to create their own database mainly from admin.waszadomena.xy.
After installing the installation package, go to the Web site on which you installed the system for content management. In our example this is demo.axfone.eu
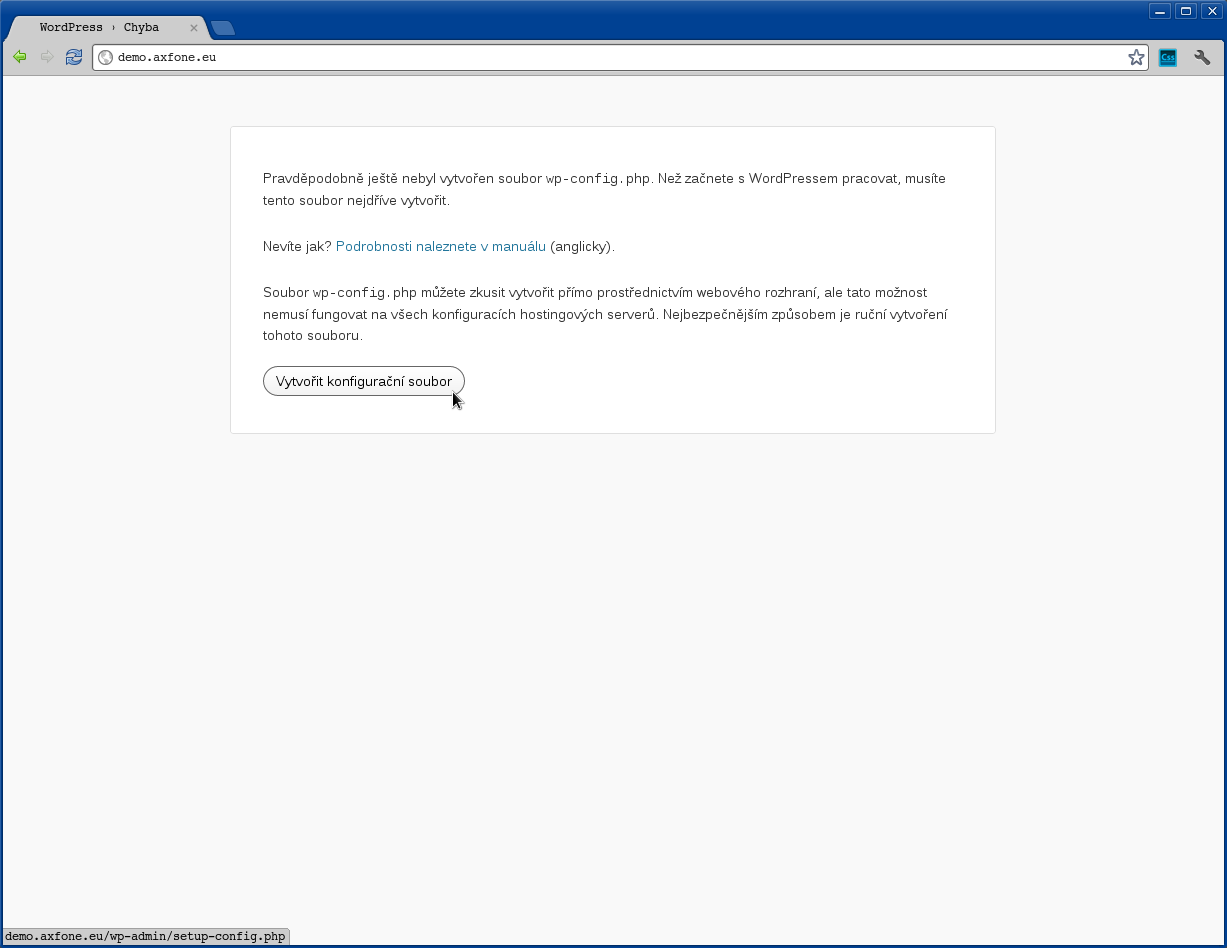
You will notice there still excists a configured file. The file does not exist due to the fact that this is a new installation. Therefore, to create this file you need to click on "Create a configuration file".
Now the installer will show you what data you need to install. If you have everything you need then you can proceed further by clicking "Next" .
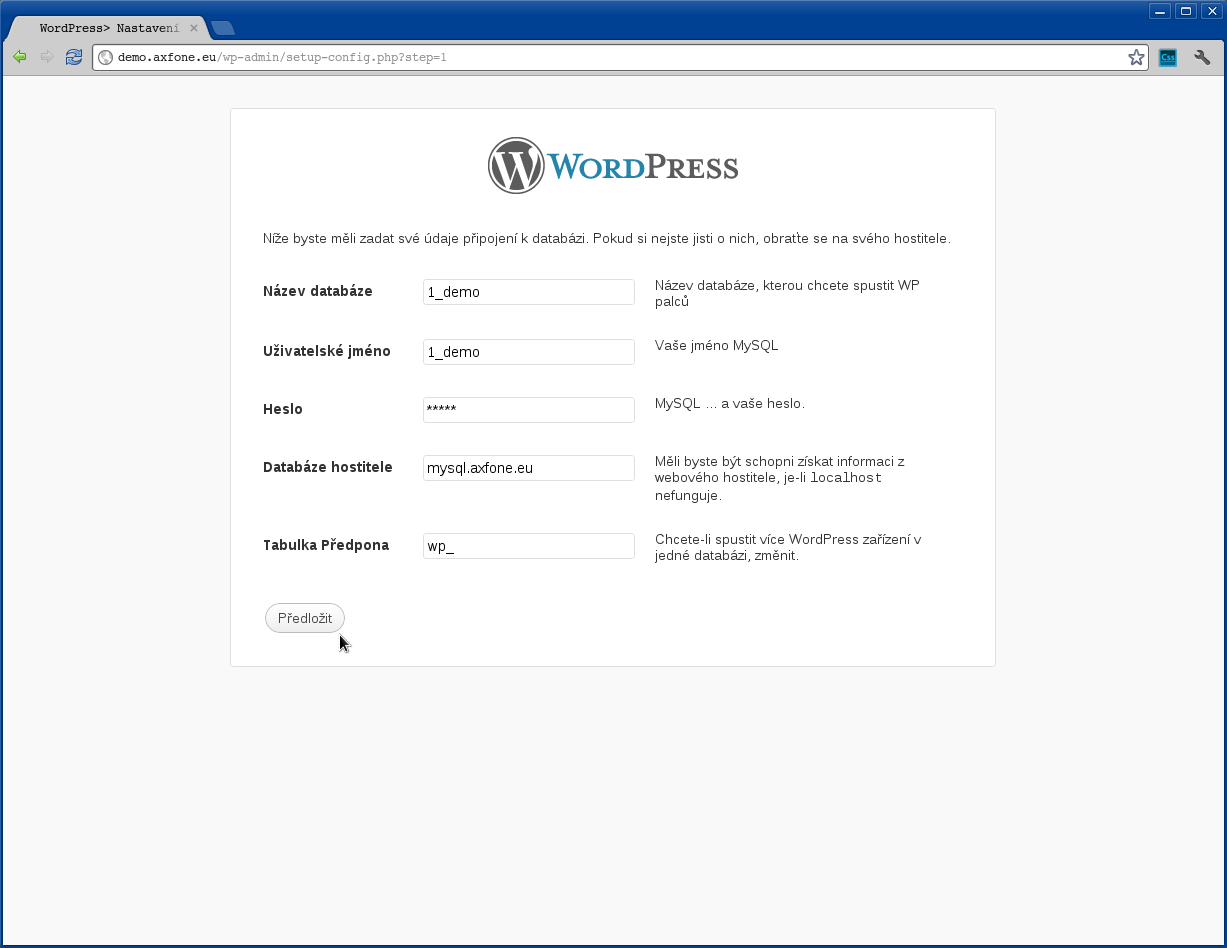
Now you need to fill out all the information needed for the proper connection to the database, where they will be stored in the system for content management. Our customers can obtain the necessary information in the administrative panel of web hosting.
Fill them up in the following way:
Name Database: 1_demo
( applicable in our installation)
Username: 1_demo
( applicable in our installation)
Password: ******
Database host: mysql.axfone.eu
( mostly mysql.waszadomena.xy )
Prefix: wp_
( default function in most cases, need not be changed)
If you have finished the operations here, you can continue by pressing "Send" button.
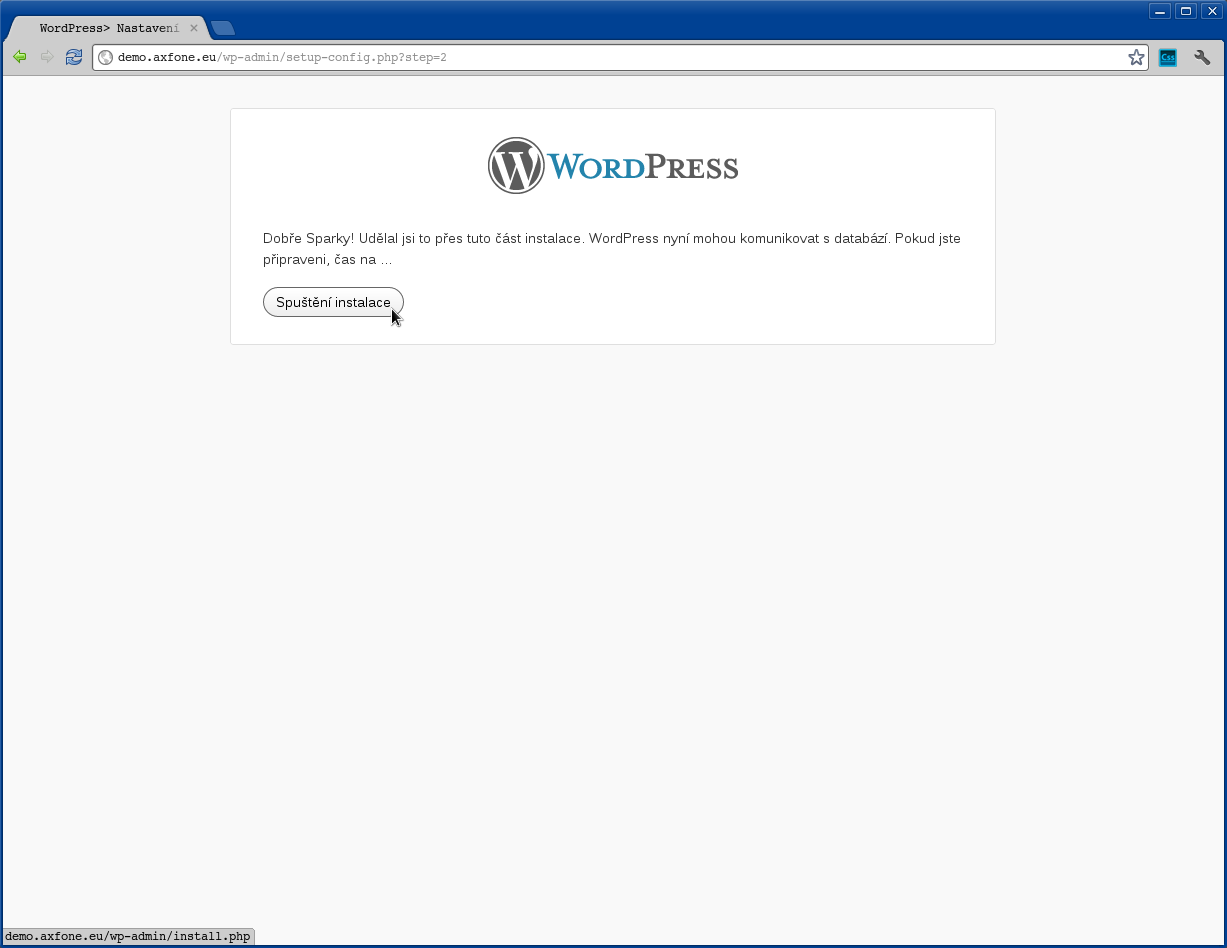
The installer checks all data entered. If everything is OK, continue with the installation by pressing "Start Installation".
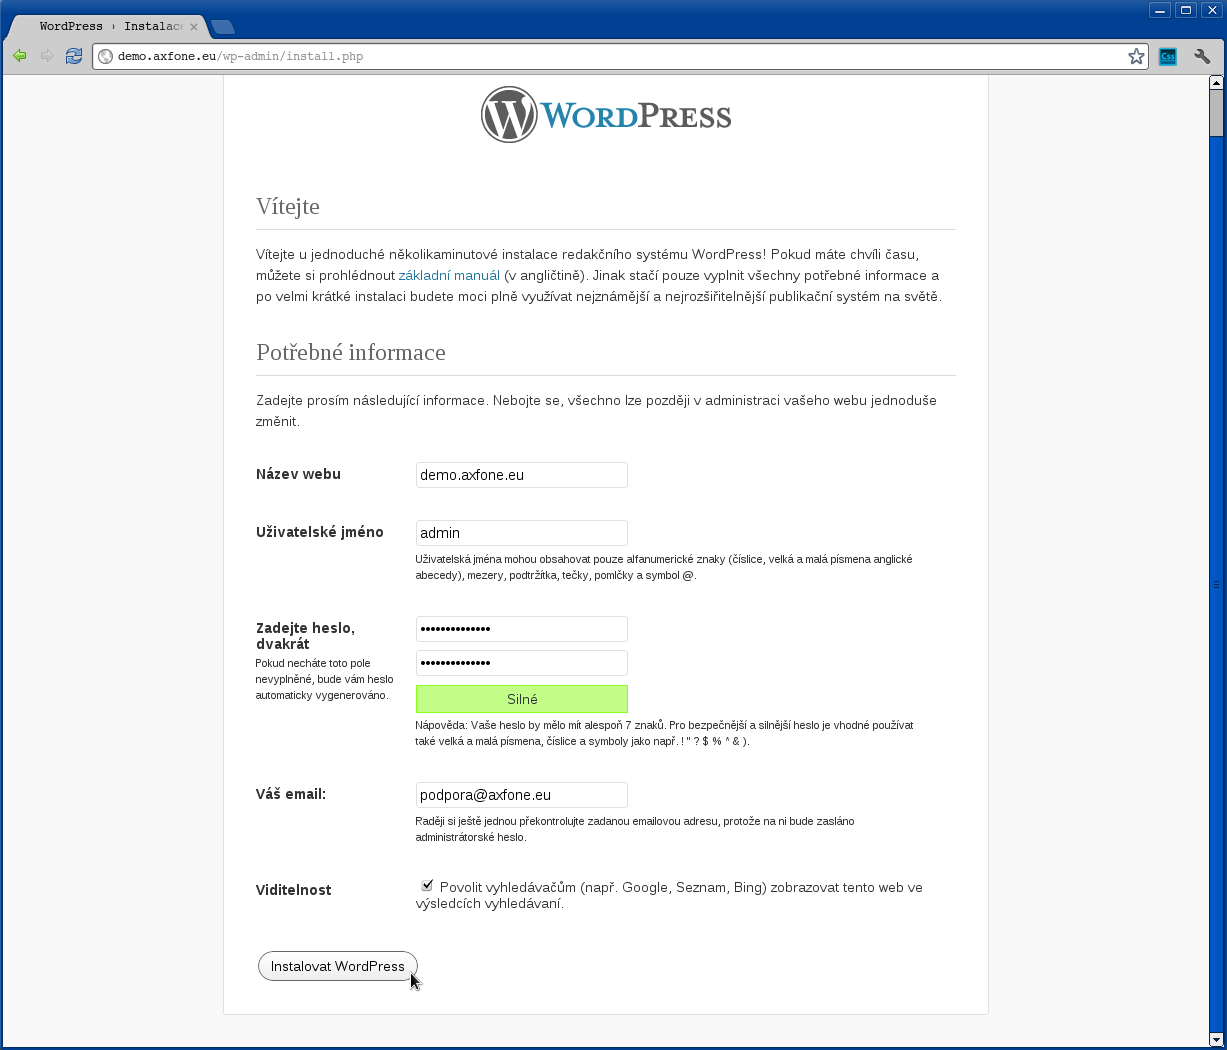
Now, after the installer is complete, the information needed for operation and management system for content management must be fulfilled.
Fill them up in the following way:
Site Name: demo.axfone.eu
( applicable in our installation)
Username: admin
(Name of the user who will have access to the administration of the editorial system)
Password: ******
Your e-mail: support@This email address is being protected from spambots. You need JavaScript enabled to view it.">axfone.eu
( applicable in our installation)
Visibility: keeping the default value
After completing the information, click "Install WordPress".
Installation is completed. You can continue logging in as an administrator in your system for content management. The application can be found on www.waszadomena.xy/administrator, but in our example is demo.axfone.eu/administrator.

Drupal
Preparing to install a system for content management.
First, you must install package management system content on your site. Drupal installation package can be downloaded from here: drupal.pl.
Also, they must provide login system for content management.
Our customers have the opportunity to create their own database mainly from admin.waszadomena.xy
After installing the installation package, go to the Web site on which you installed the system for content management.
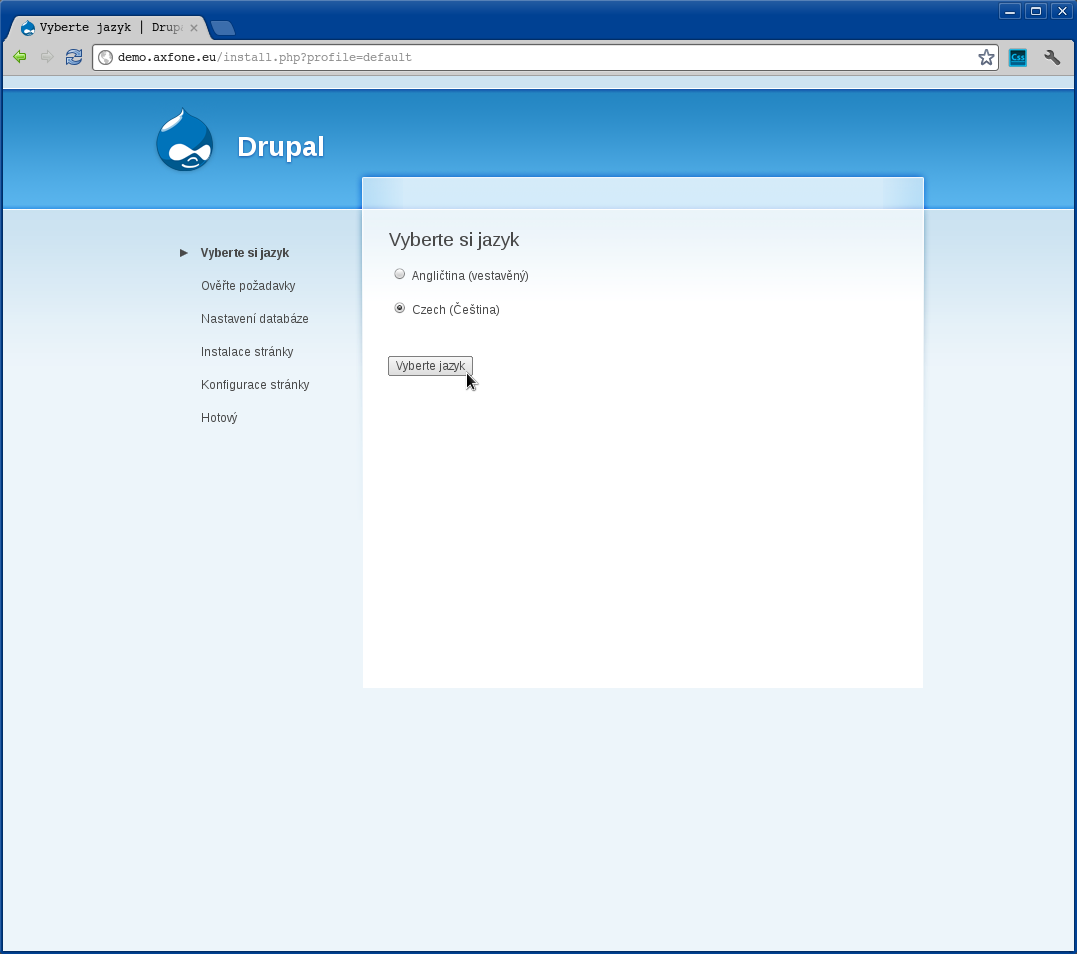
Select the language you want to install by pressing the "Select Language".
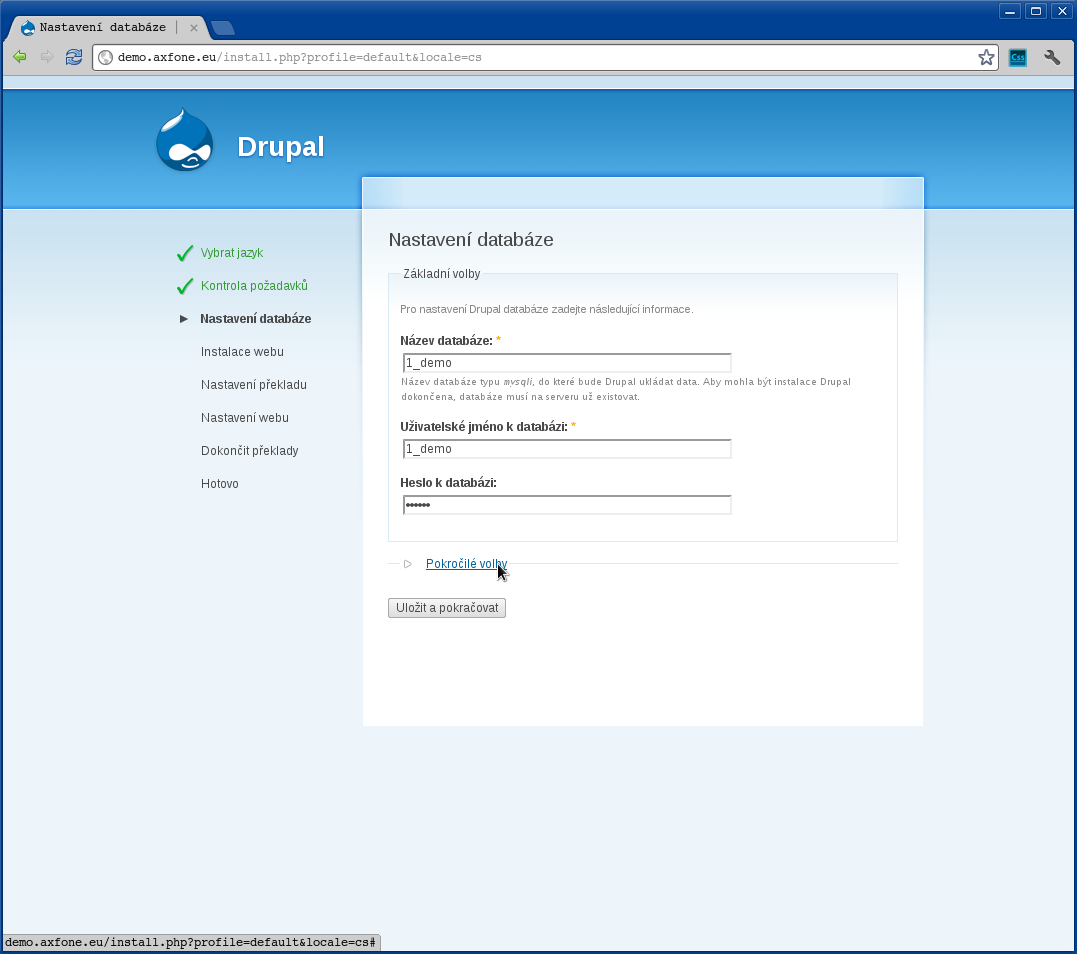
Now you need to fill out all the information needed for the proper connection to the database, where they will be stored in the system for content management. Our customers can obtain the necessary information in the administrative panel of web hosting.
Fill them up in the following way:
Database name: 1_demo
( applicable in our installation )
Username: 1_demo
( applicable in our installation)
Password database: *****
To continue and set the settings for connecting to the database, please click "Advanced Options"
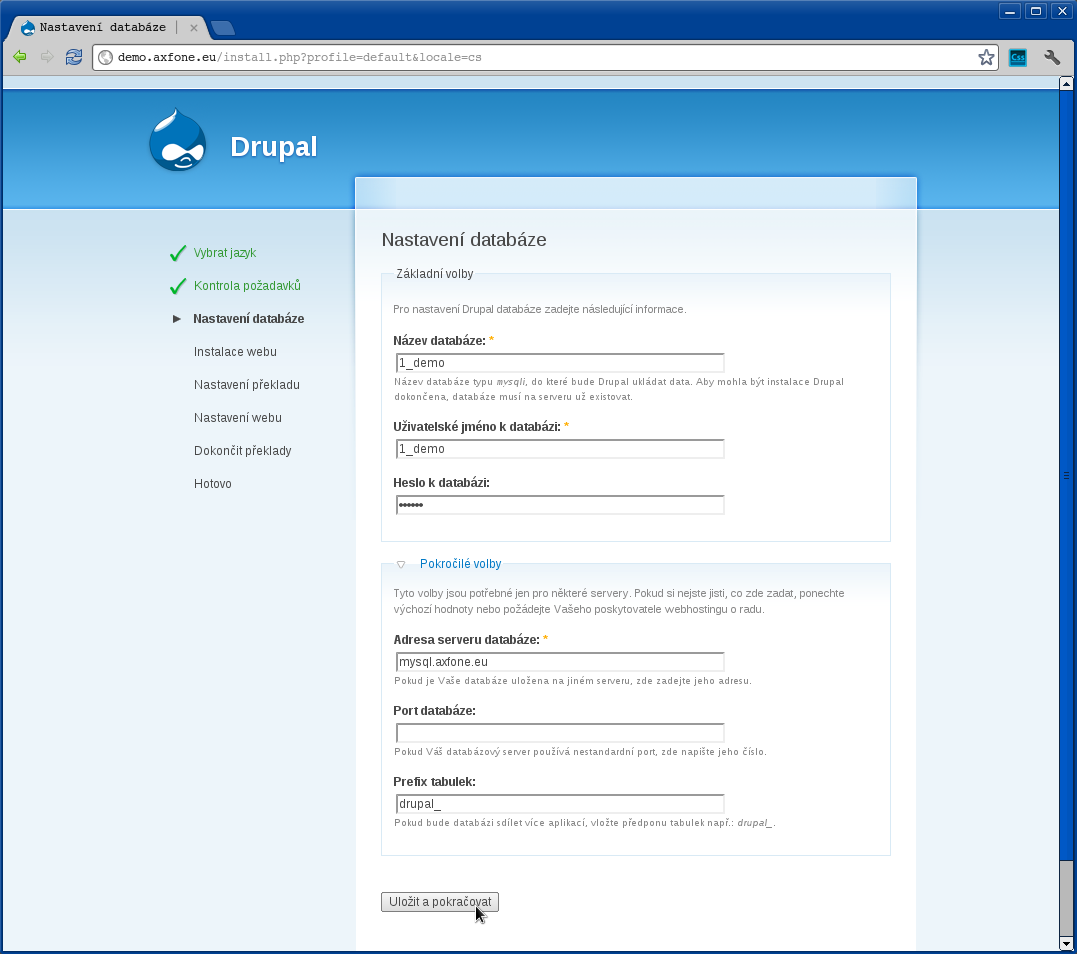
If you have a database that is located on another server, or must specify other parameters which are necessary to connect, fill in the following fields:
In our case, fill in:
Address DB server: mysql.axfone.eu
Port Database: not filled
( because our database is using the standard port)
Tables prefix: drupal_
After specifying the data, continue to assess other parameters of the system Drupal by clicking on "Save and Continue".
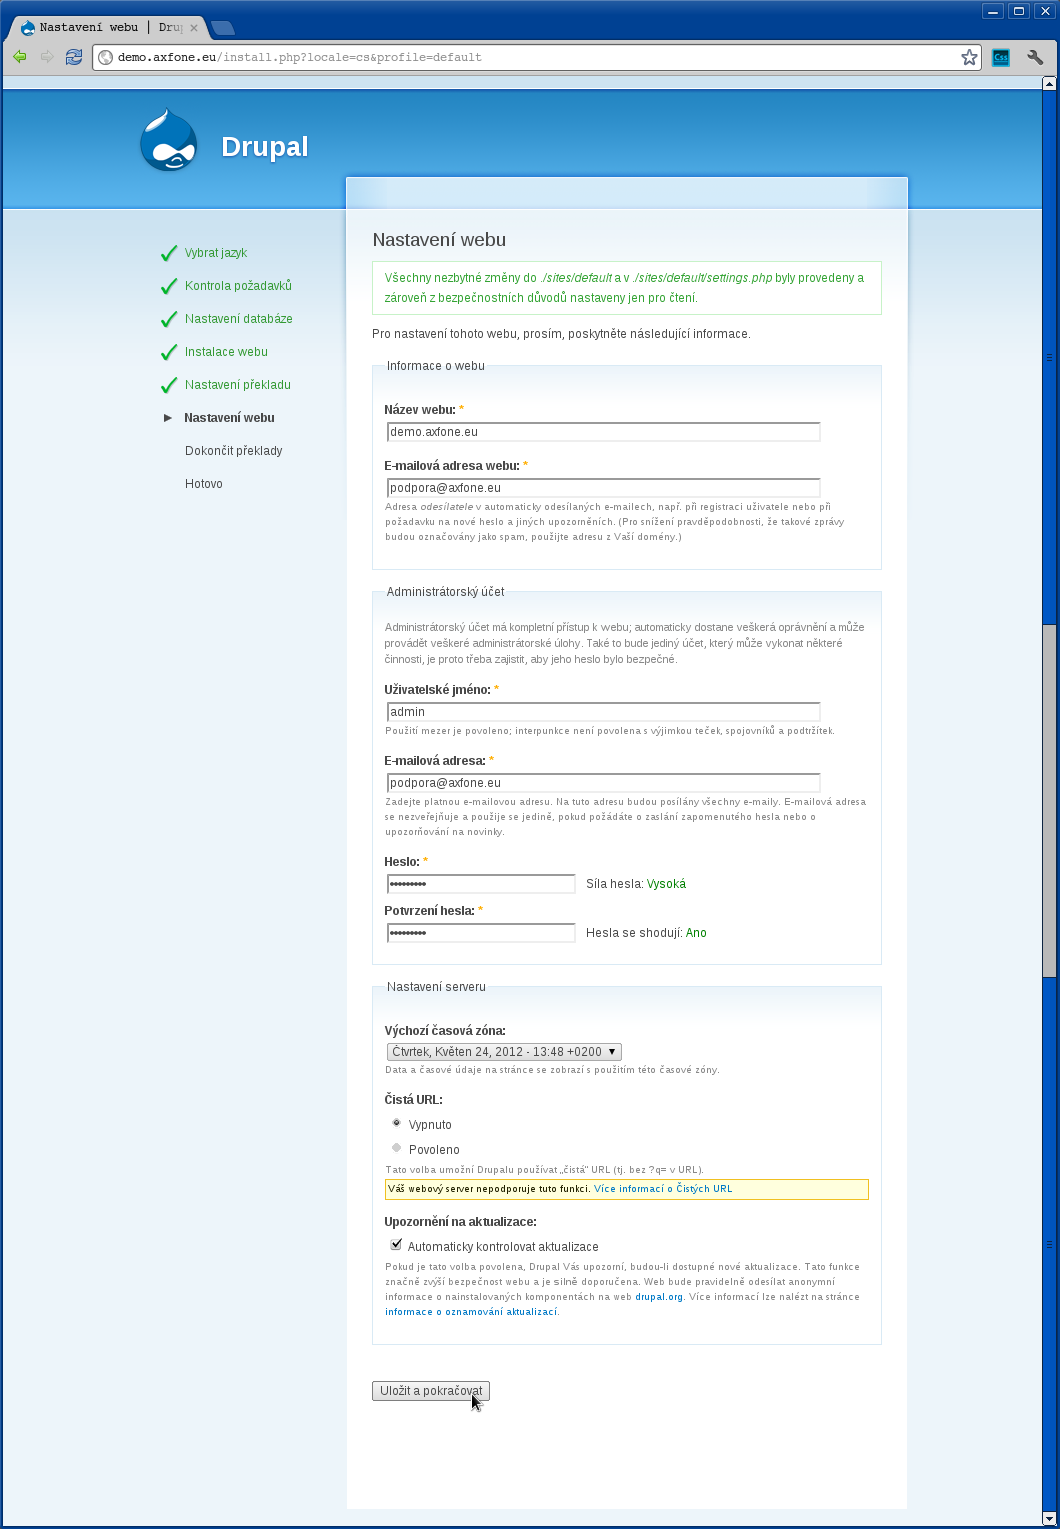
Now, after the installer is complete, information are needed for operation and management system for content management. You must complete the following information.
Fill them up in the following way:
Site Name: demo.axfone.eu
( example of installation )
Email address: This email address is being protected from spambots. You need JavaScript enabled to view it.
( example of installation )
Username: admin
( example of installation )
Password: *****
( choose a password for the Administrator account Content Management)
After completing all the necessary information, click "Save and Continue" to complete the installation.
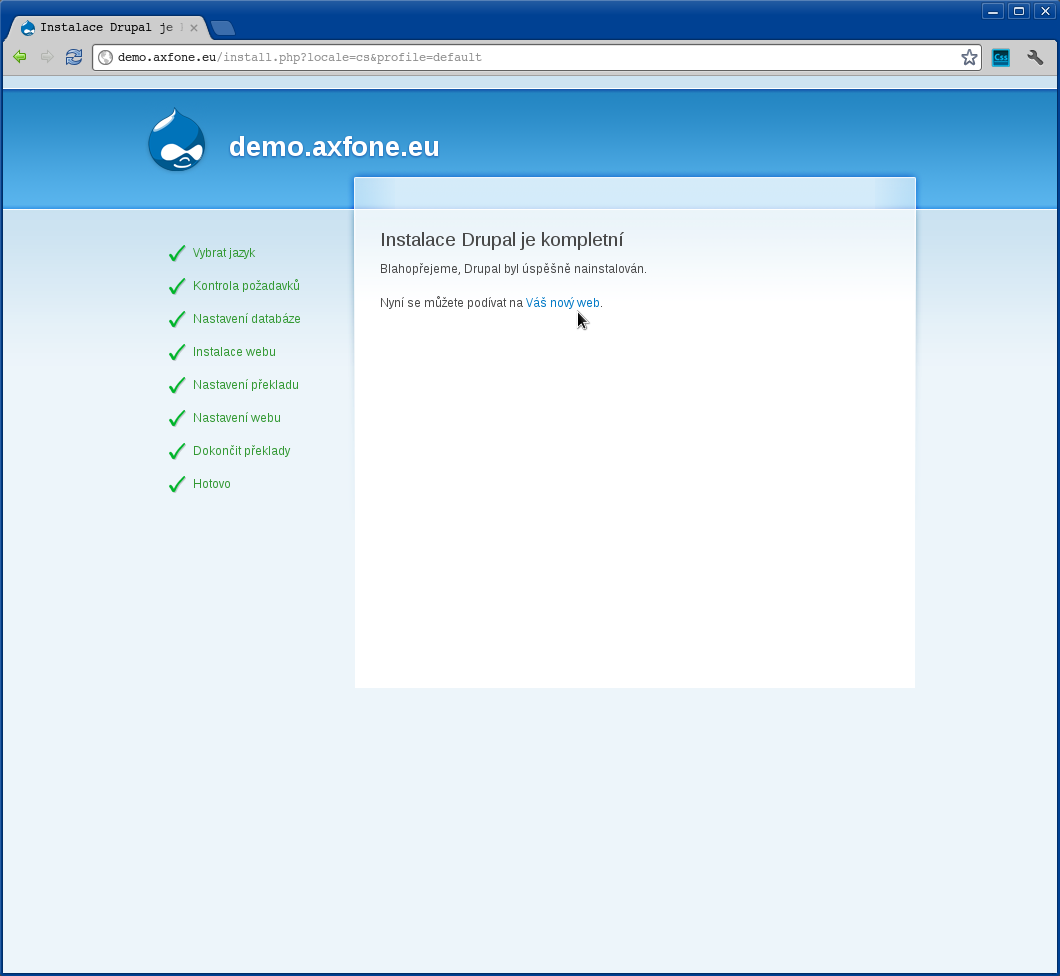
Installation is completed. You can continue logging in as an administrator in your editing system by pressing "your new site".

PHP Fusion
Preparing to install a system for content management
First, you need a CMS installation package for you to enter the website. The Installation package PHP-Fusion can be downloaded from here phpfusion.pl.
Moreover, you should prepare a system for management of data content and then create a login. Our customers have the opportunity to create their own databases. Most are under the address admin.waszadomena.xy
After placing the installation package, be sure to rename soubour _config.php of config.php and then go to the address of your site where you can install the system for content management. In our example is: demo.axfone.eu.
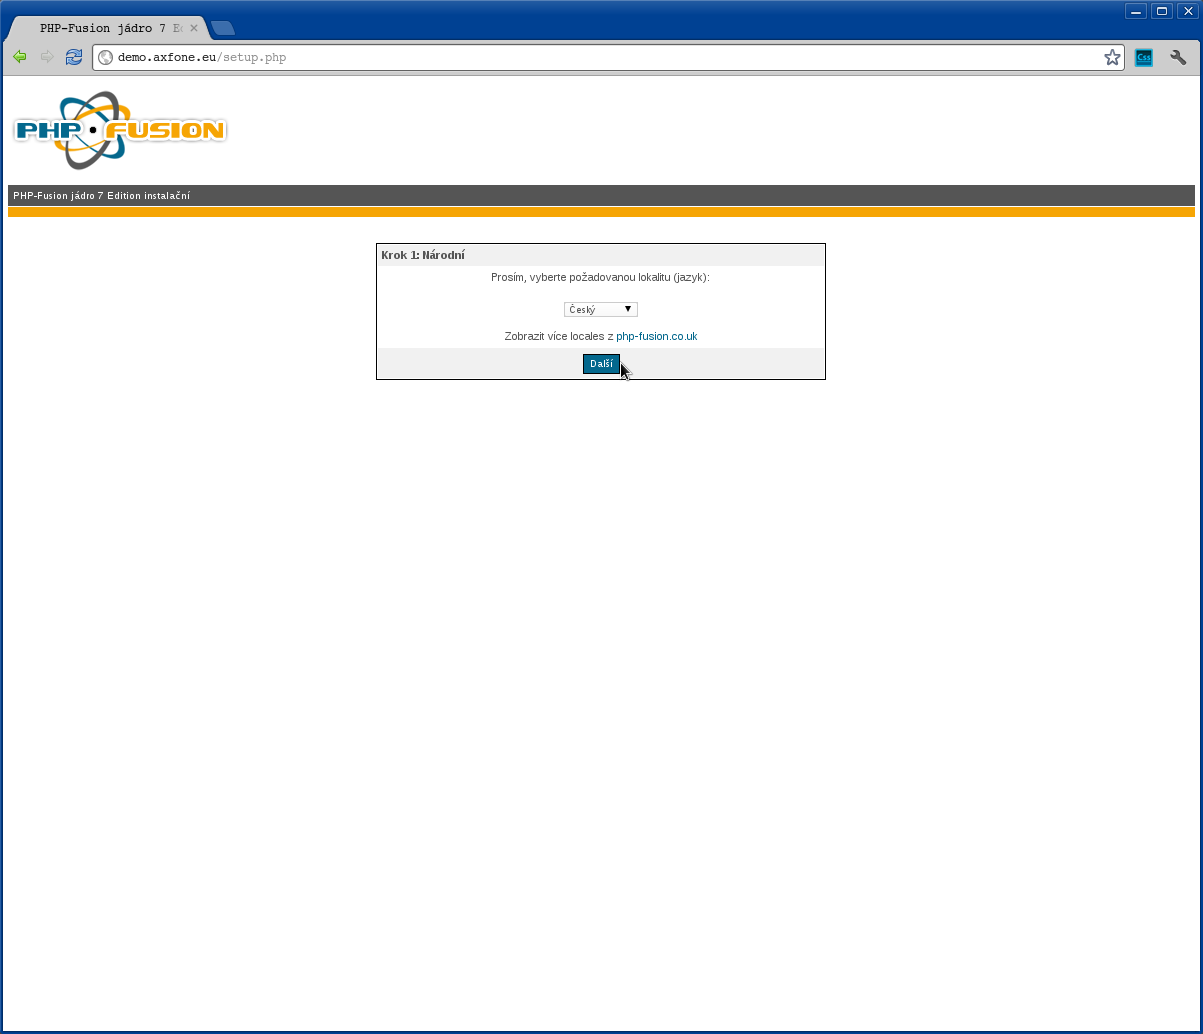
At the initial stage of installation, you can select the language of the installation. After the selection, click "Next" to continue with the installation.
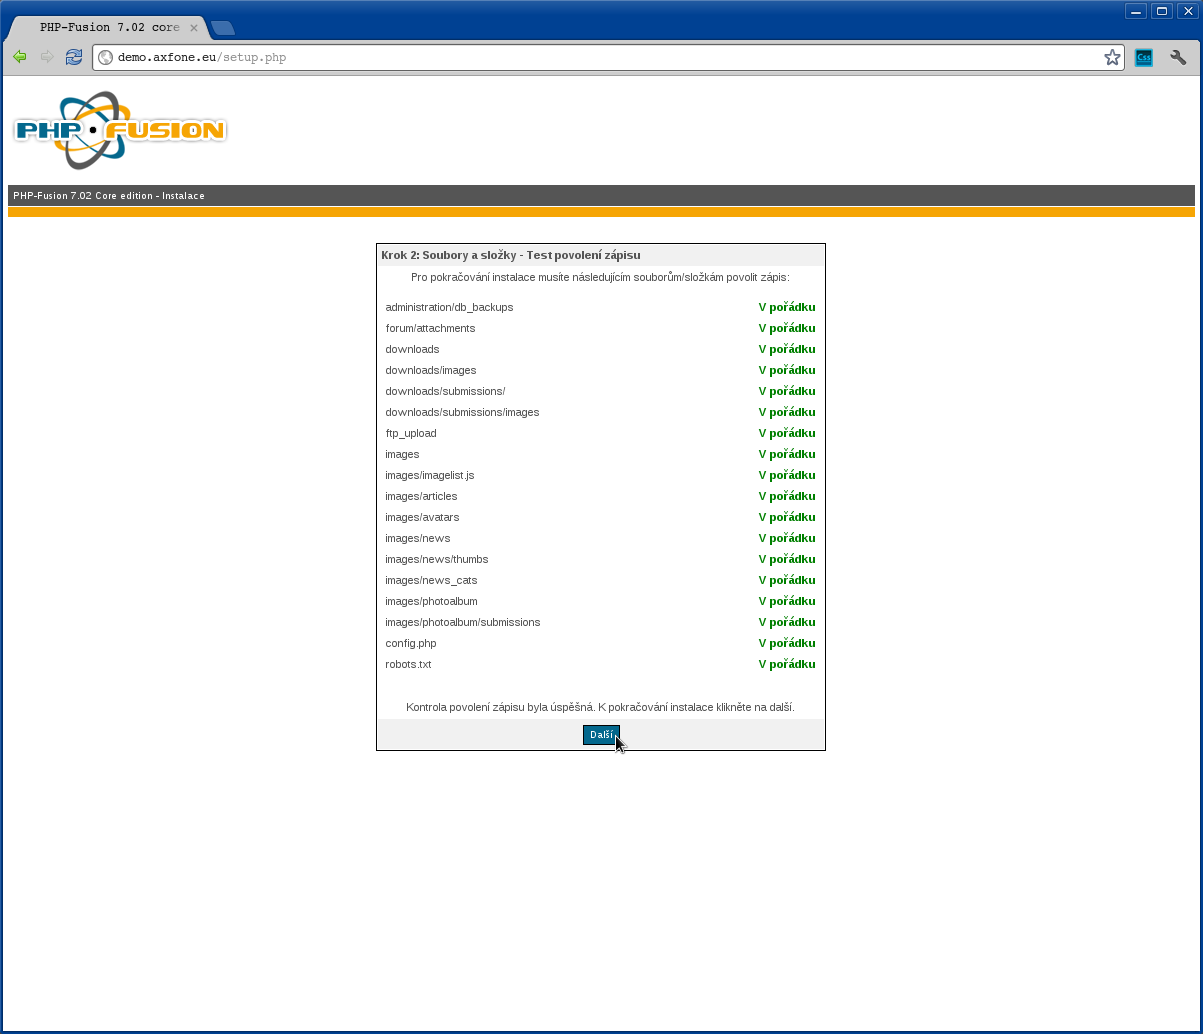
In this step, the installer performs control functions which are available for installation of CMS. If everything is OK click "Next".

Now you need to fill out all the information needed for the proper connection to the database, where the information will be stored in the management system content. Our customers can obtain the necessary information in the admin panel of your web hosting.
Fill them up in the following way:
Address database: mysql.axfone.eu
( our example of installation )
Username: 1_demo
( example of installation )
Password: *****
( example of installation)
Database name: 1_demo
( оnly for trial installation )
Table Prefix: Keep the default valuе
Cookie prefix: Save default
After completing all the necessary information, click "Next" to continue with the installation.
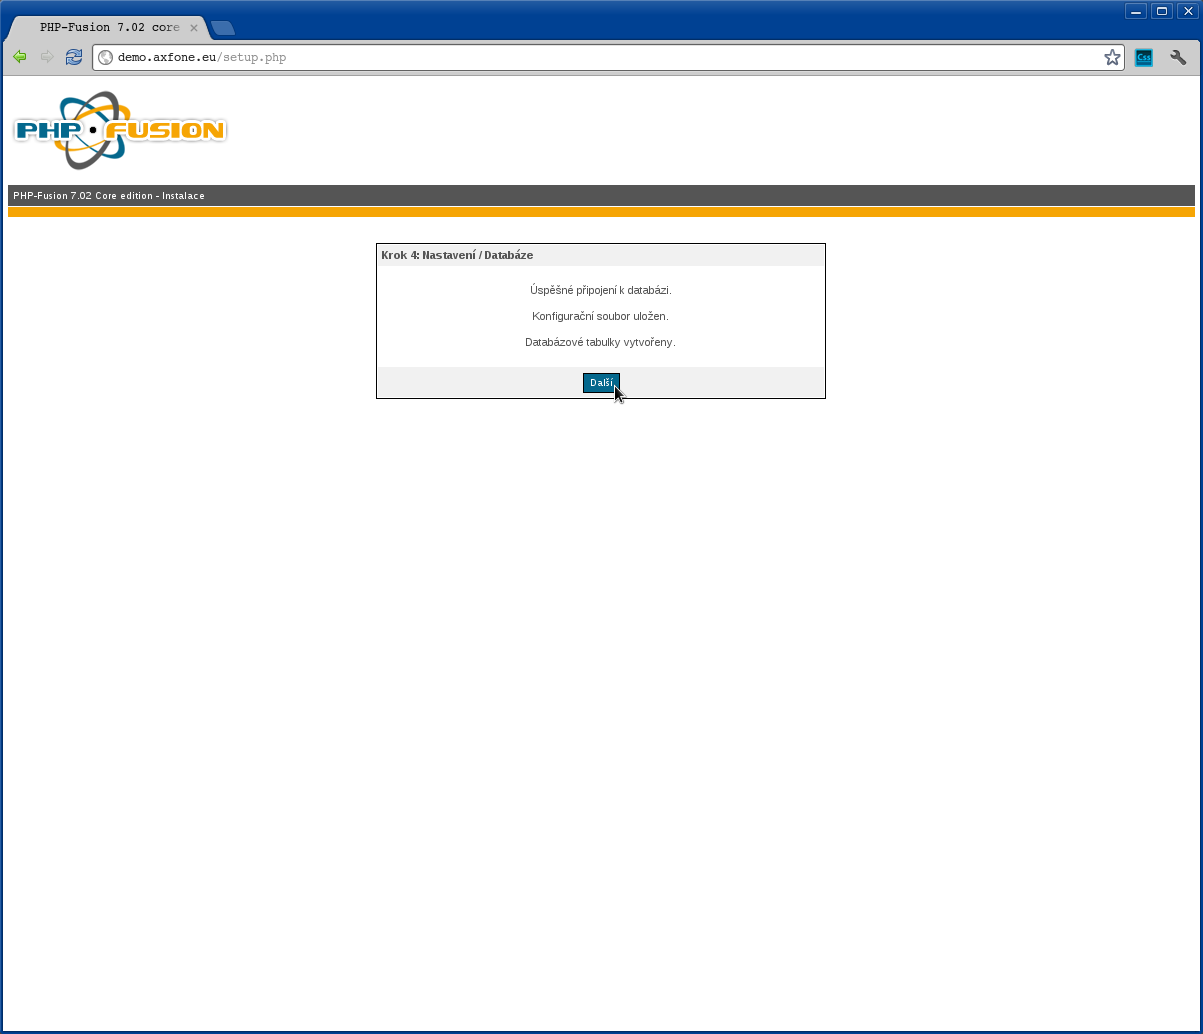
The installer verifies the data. If everything is okay, continue the installation by pressing "Next" button.
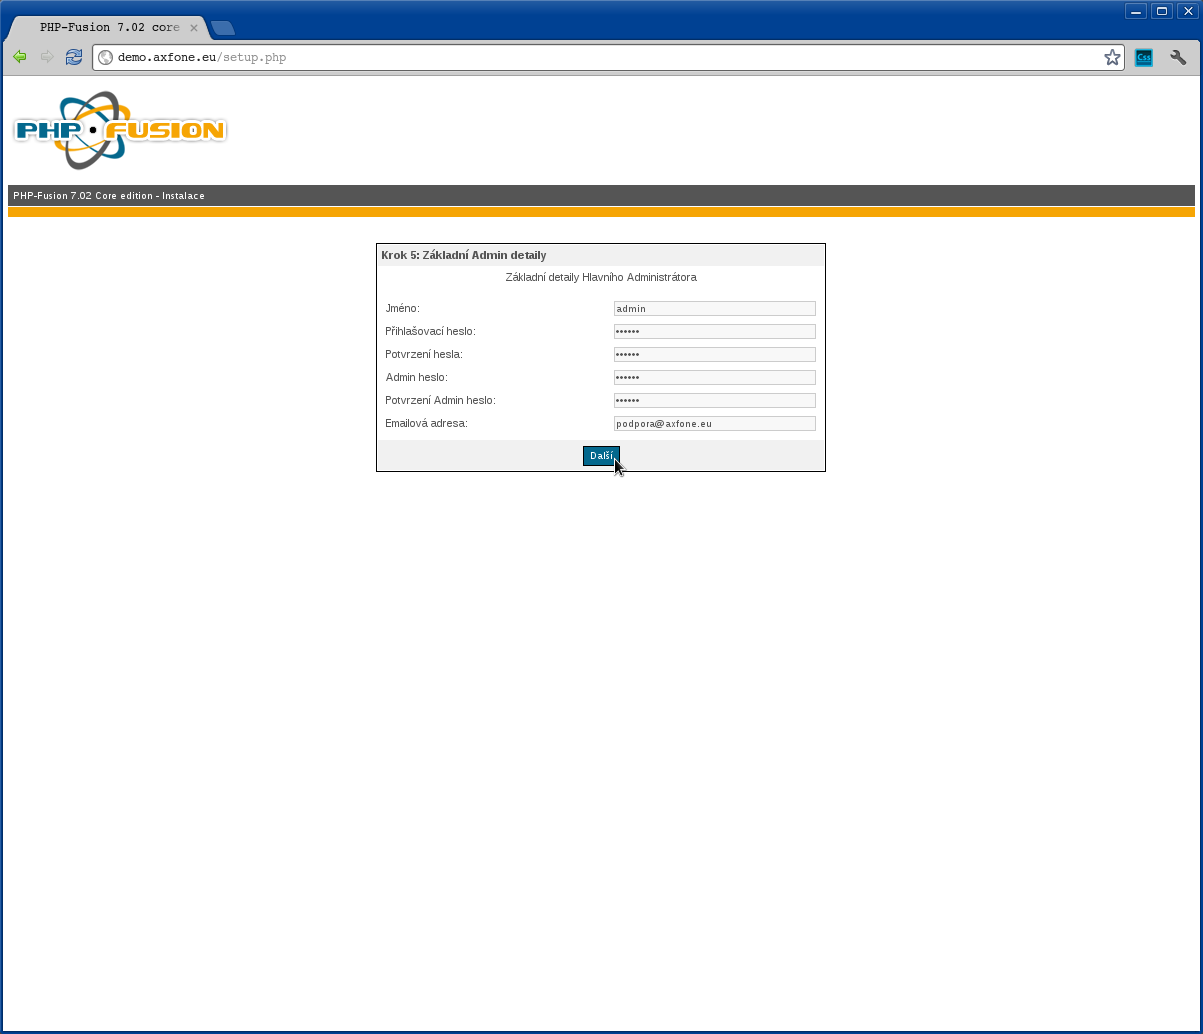
Once the installer completes the necessary information which are needed for the operation and management of your system for content management, you must complete the following information.
Fill them up in the following way:
Name: admin
( enter the login name)
Login password: *****
( choose an account password of the system administrator )
Admin password: *****
(This password is used for user operations in the educational system, such as backup and restore data )
Email address: This email address is being protected from spambots. You need JavaScript enabled to view it.">This email address is being protected from spambots. You need JavaScript enabled to view it.
( only for trial installation )
After completing all the necessary information, click "Next".

To complete the installation, press "End".
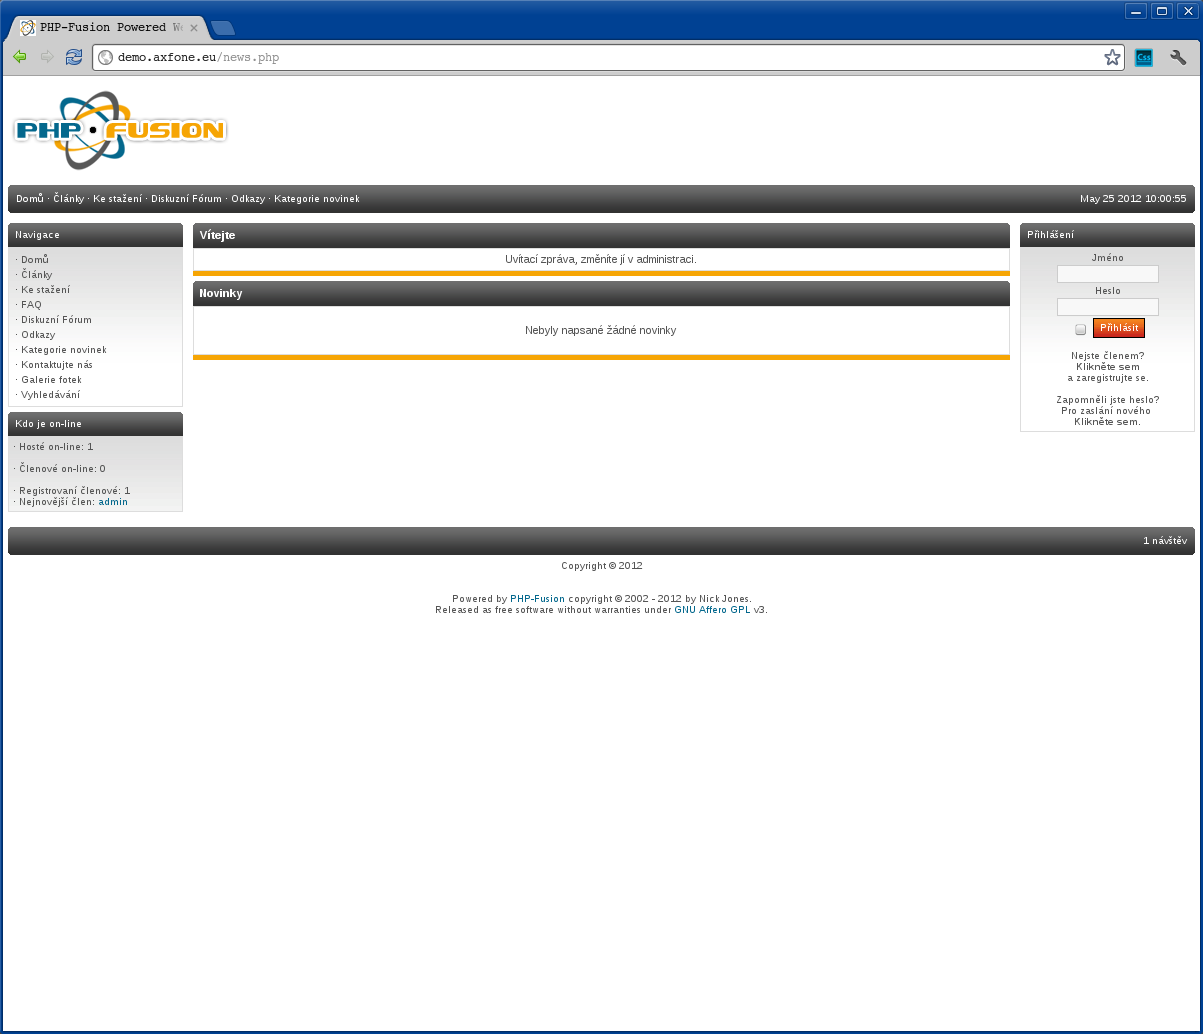
Installing editorial system was successfully completed. Go to the administration panel with your information entry through the form on the right side of the screen.
osCommerce
Preparing to install trading system
First, you need an installation package for OsCommerce system in your website. The installation package can be downloaded for example here: http://www.oscommerce.com/solutions/downloads/. Furthermore, it needs to prepare the database for trade data and enter the login. Our customers have the opportunity to create their own databases. Can be done at: admin.waszadomena.xy
After inserting the installation package, go to the Web site on which you installed the system for content management. In this case, for example, you can open the page demo.axfone.eu .
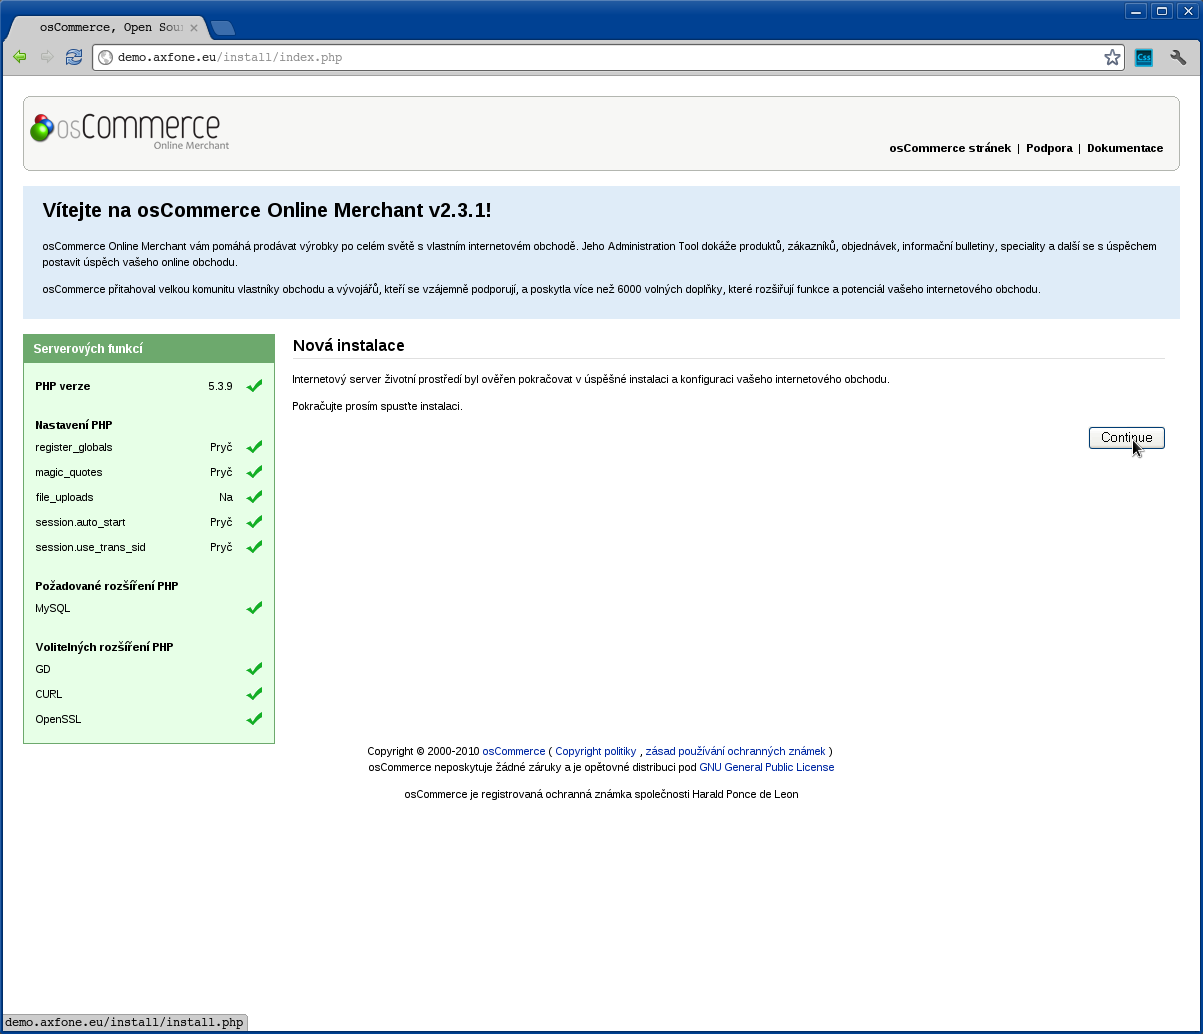
In this step, the installer examines the available features of the system. If everything is alright click "Continue."
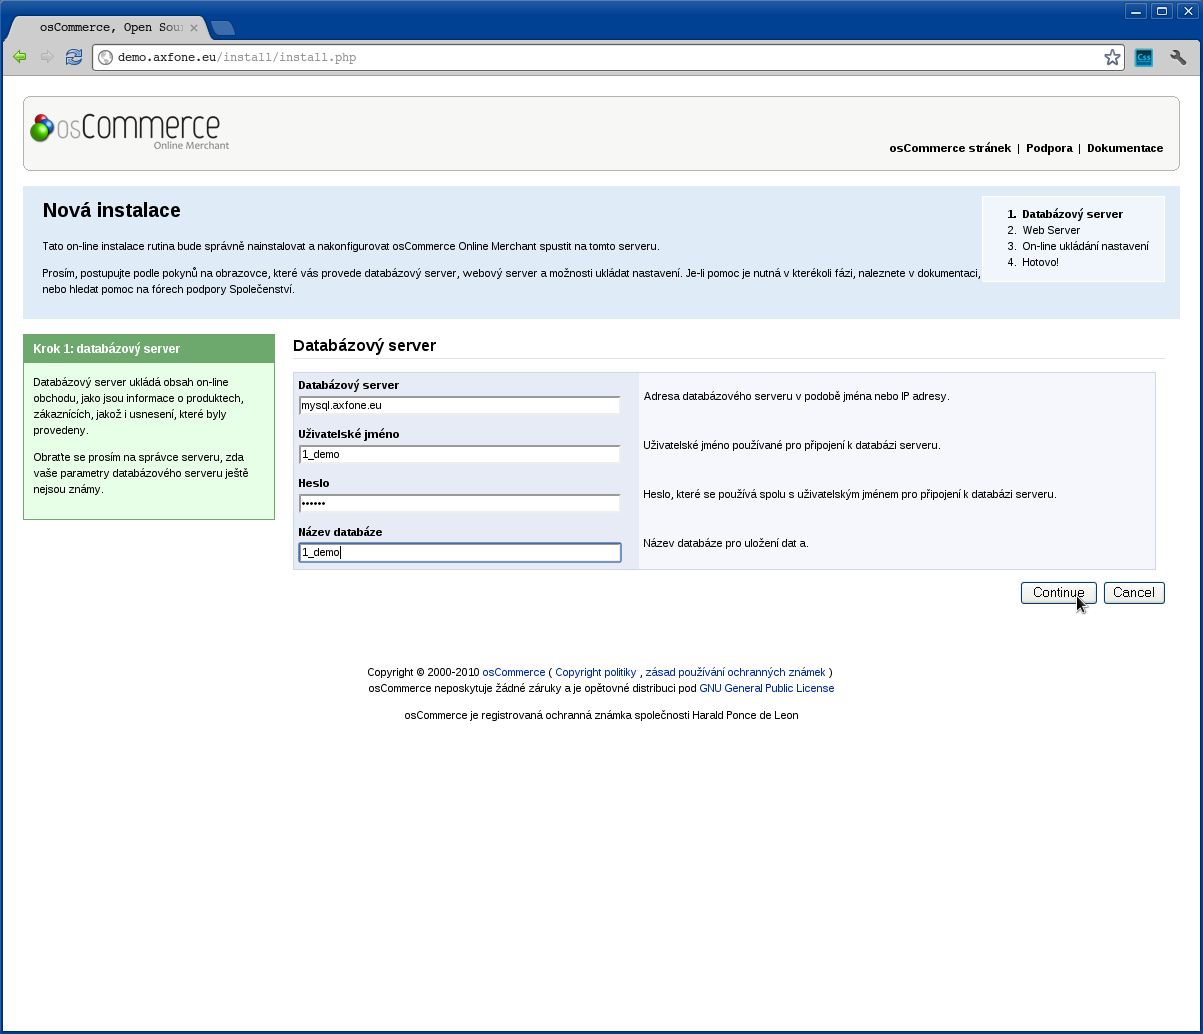
Now you need to fill out all the information needed for the proper connection to the database, where the data will be stored system for content management. Our customers can obtain the necessary information in the admin panel of your web hosting.
You need to fill in:
Server database: mysql.axfone.eu
( example of installation)
Username: 1_demo
( example of installation)
Password: *****
( example of installation)
Database name: 1_demo
( only test installation )
After completing all the necessary information, press "Continue" to the next step of installation.
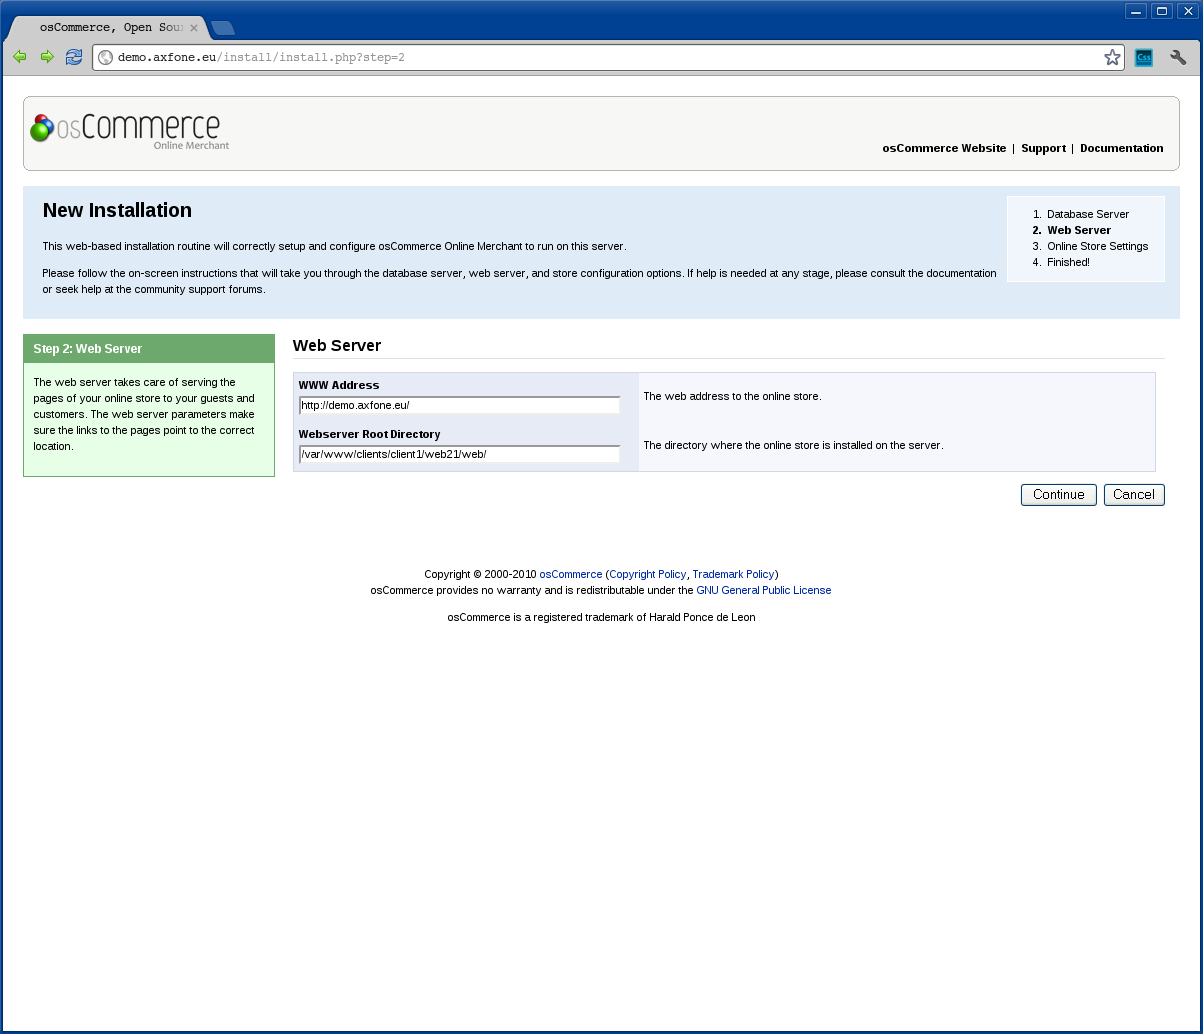
In this part of the installation, you must fill / check location information to your online store.
You must fill in the following manner:
Аddress www: http://demo.axfone.eu
( only installation )
Web server root directory:
( keep the default settings)
After completing all the necessary information, click "Next" to continue the installation.
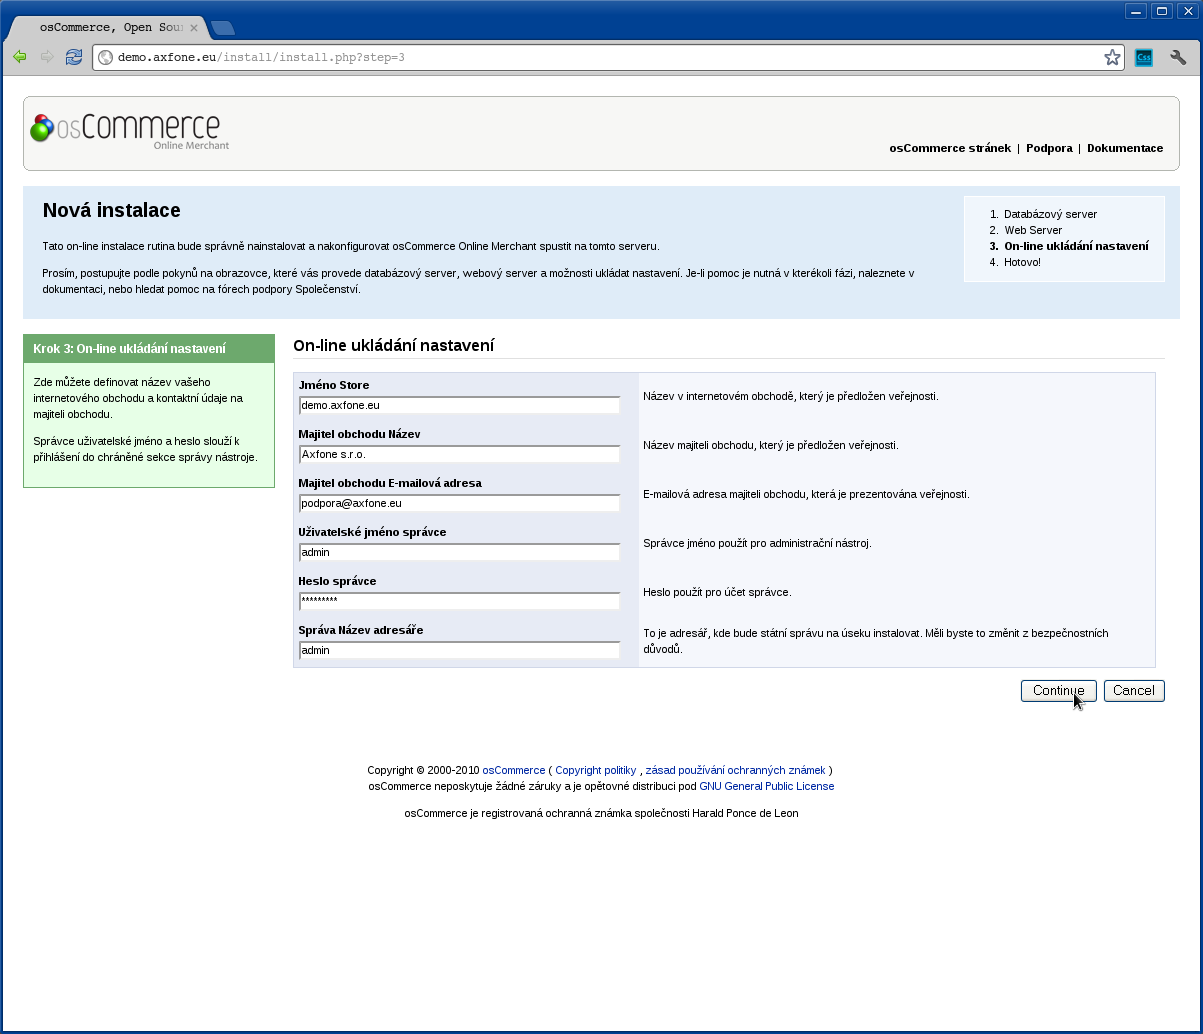
Once the installer complete information needed for operation and management of our business system, you must complete the following information.
Fill them up in the following way:
Trade name: demo.axfone.eu
( applicable in the test installation )
Shop owner: Axfone s.r.o.
( applicable in the test installation )
Username administrator: admin
( applicable in the test installation )
Username administrator: *****
( applicable in the test installation )
Name the administrative directory: admin
( applicable in the test installation )
After completing all the necessary information, click "Next" to continue the installation.
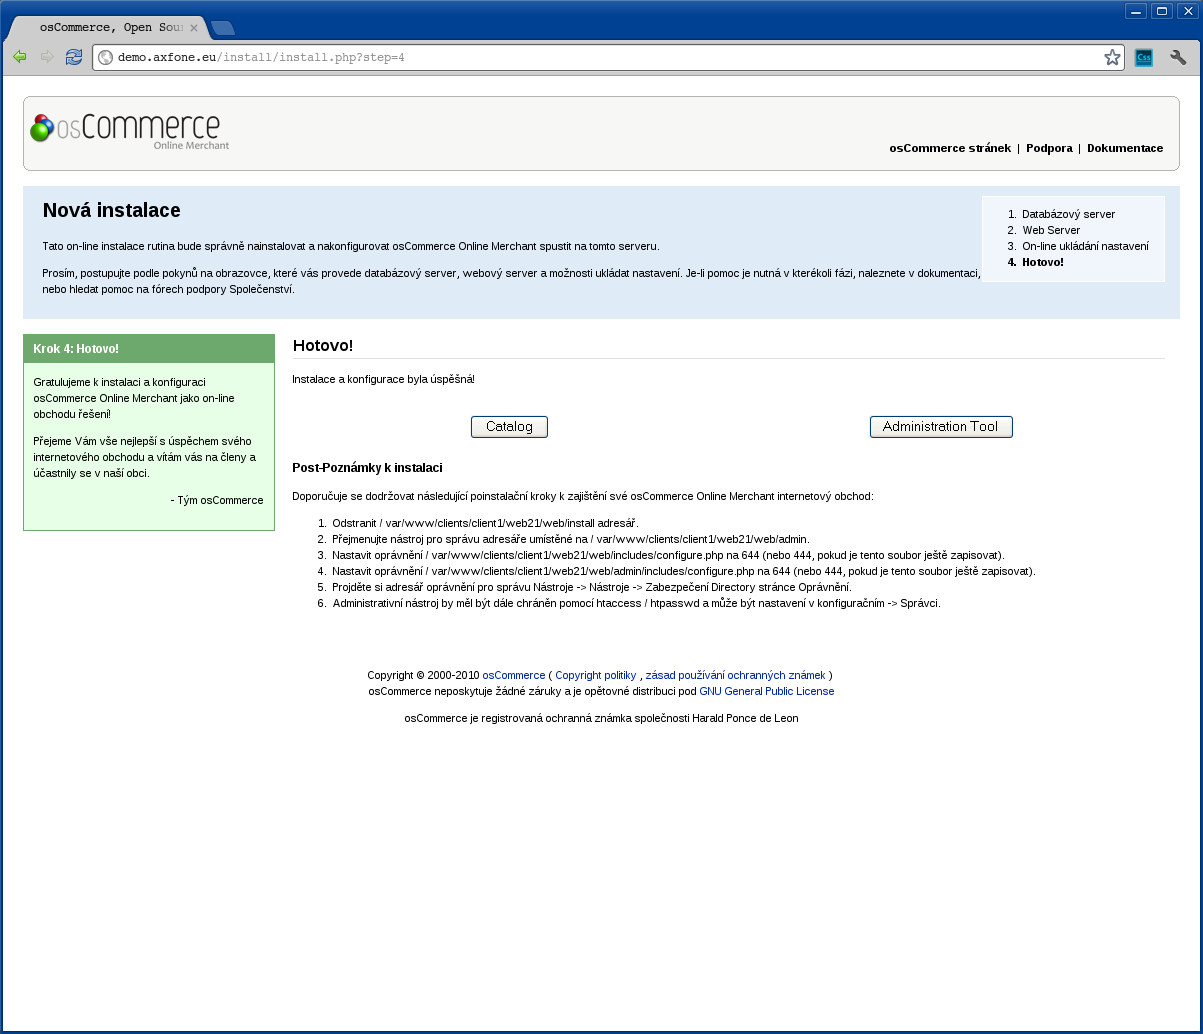
Installation trade system has been successfully completed.
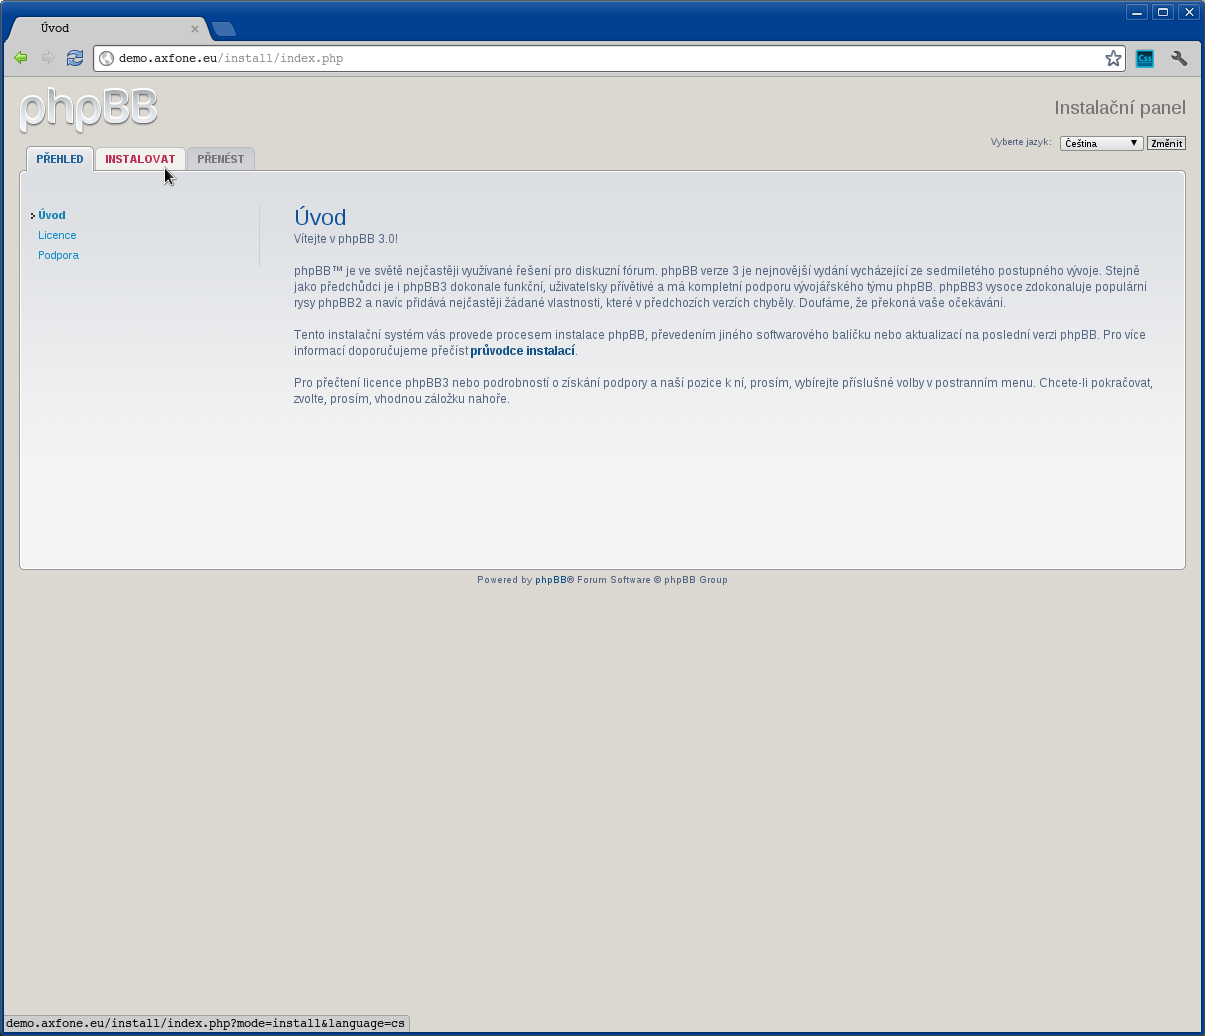
phpBB
Preparing to install a system for content management
First, you need to install the installation package PHPBB in your site. The installation package can be downloaded from here http://www.phpbb.pl/. Furthermore, it needs to prepare the database for trade data and enter the login. Our customers have the opportunity to create their own databases. Mozhe become at admin.waszadomena.xy
After inserting the installation package, go to the Web site on which you installed the system for content management. In this case, for example, you can open the page demo.axfone.eu.
Once your splash screen, go to the next step, click the "Install" in the upper left corner of the screen.
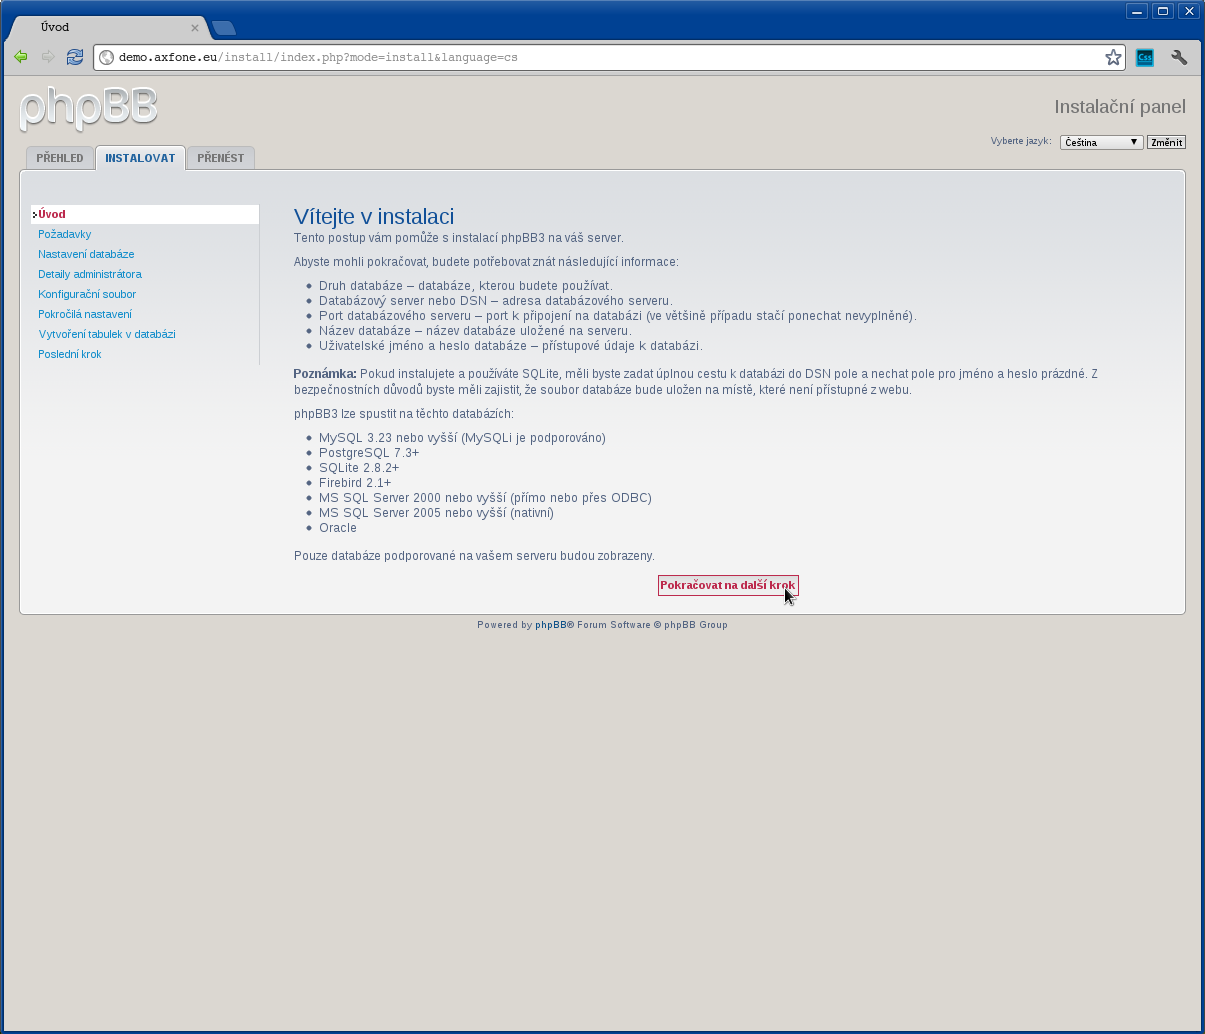
To continue with the installation, click "Continue to the next step."
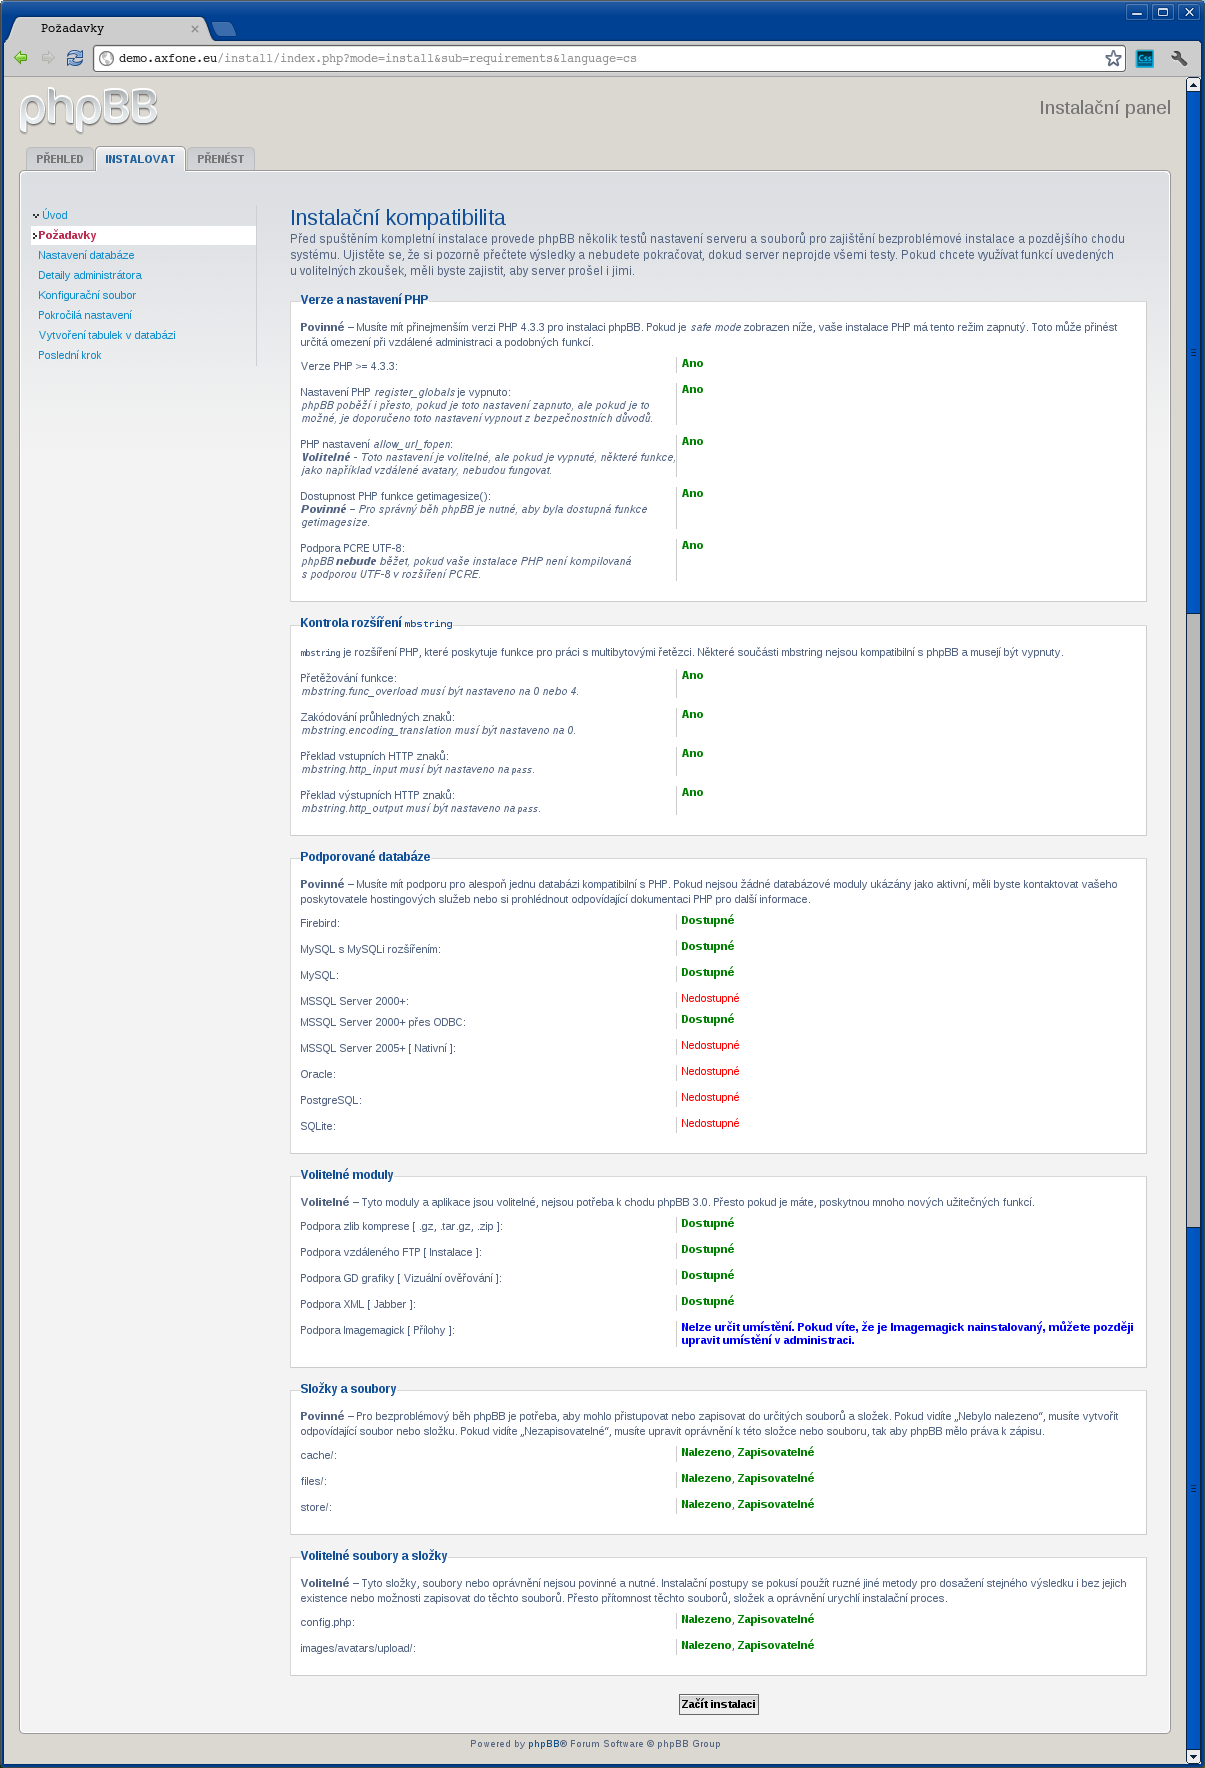
Should check whether the server supports all necessary functions. If everything is OK, you can continue by pressing the "Start Installation".
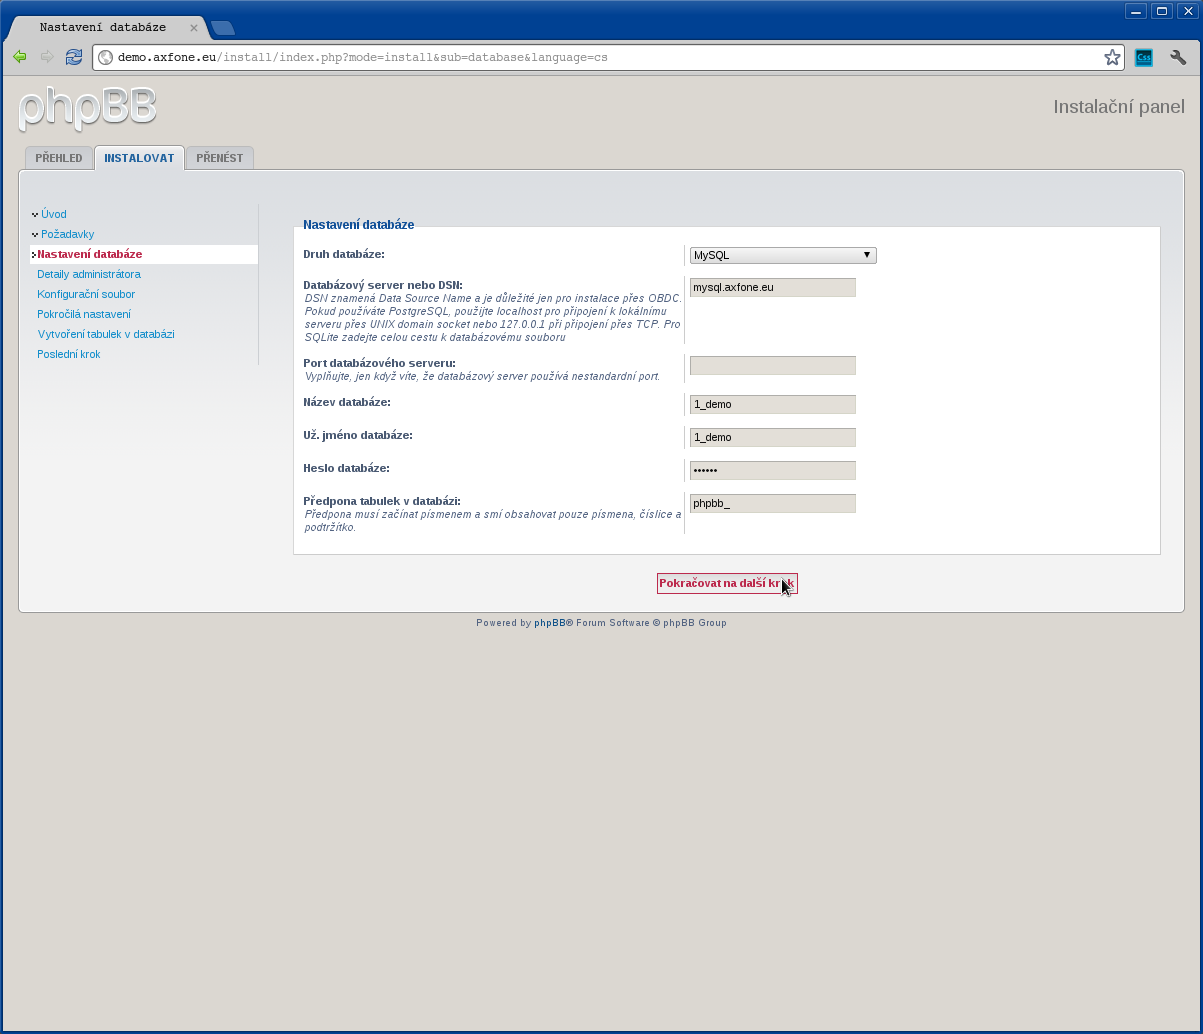
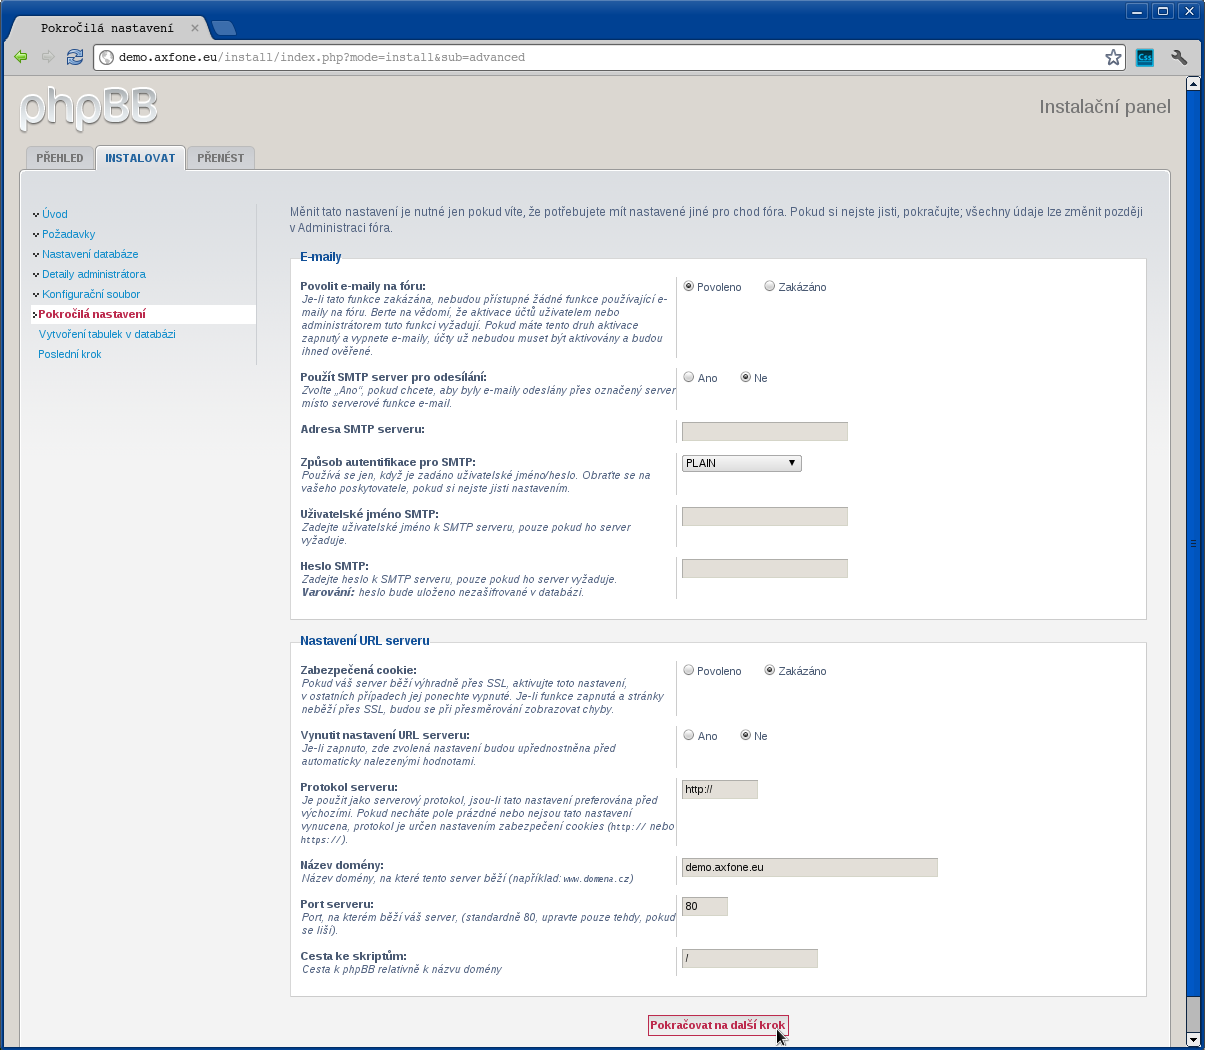
Once the installer complete information needed for operation and management of our business system, you must complete the following information.
Fill them up in the following way:
Types of database: MySQL
( applicable in the test installation )
Database server or DNS: mysql.axfone.eu
( applicable to the test installation )
Database name: 1_demo
( applicable in the test installation )
Username database: 1_demo
( applicable in the test installation )
Password database: ******
( enter the password to connect to the database)
Prefix tables in the database:
( to store the default value)
After entering the necessary data to continue press "Continue to the next step."
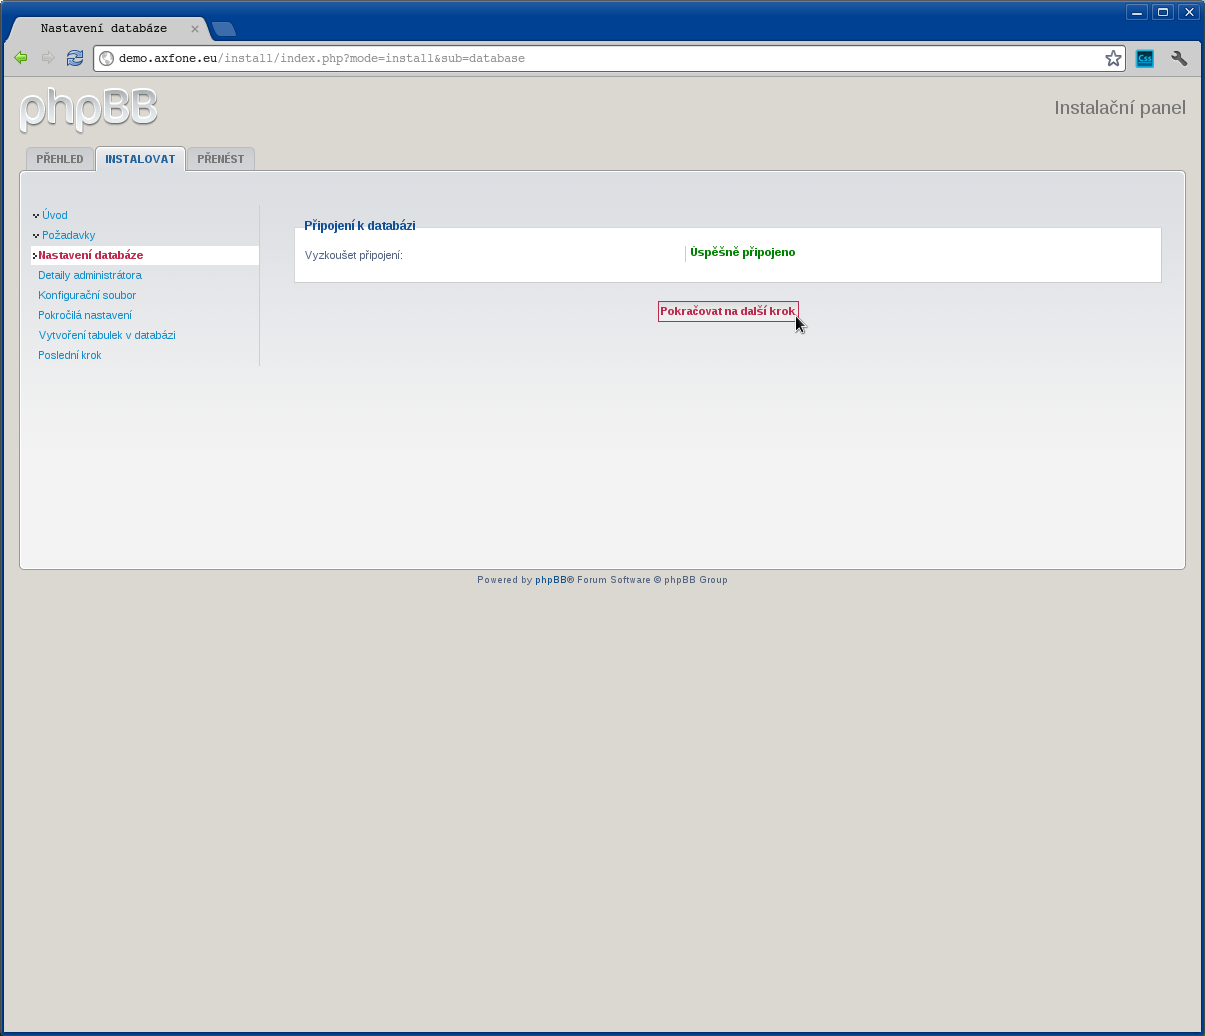
Now installation script will check the database connection. If everything is correct, you can continue by pressing the "proceed to the next step."
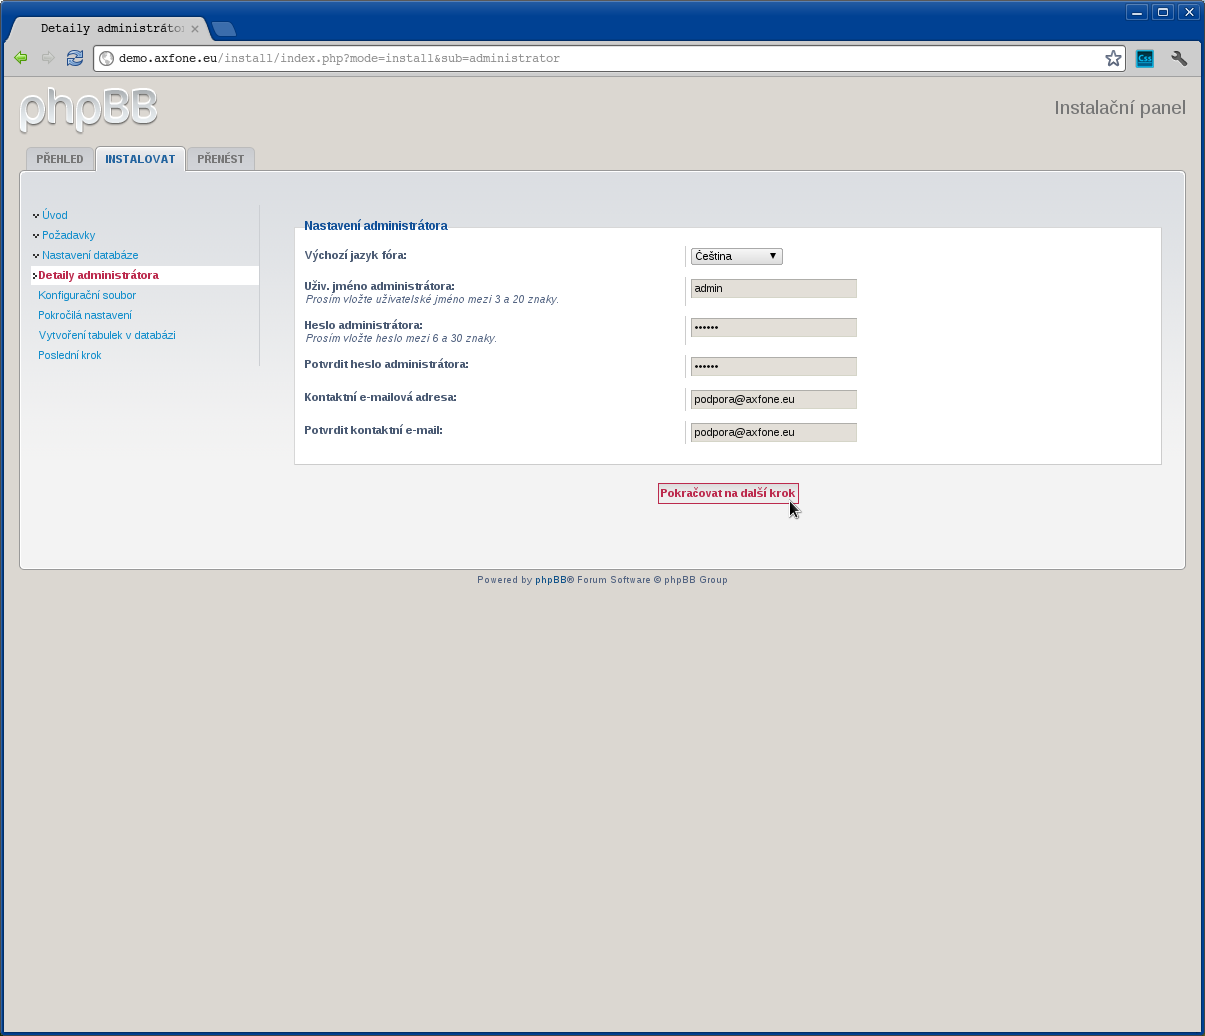
At this stage, the installer requires you to fill in the data for the system to install the Administrator account.
Fill out this way:
Name of the controller: admin
( select the name of the system administrator login)
Admin Password: *****
( enter the password for the Administrator account )
Confirm administrator password: *****
( confirm password)
Email contact: This email address is being protected from spambots. You need JavaScript enabled to view it.
( enter the administrative emai)
Email contact: This email address is being protected from spambots. You need JavaScript enabled to view it.
( confirmation of the entered email)
After completing all the necessary data to proceed with the installation click "proceed to the next step."
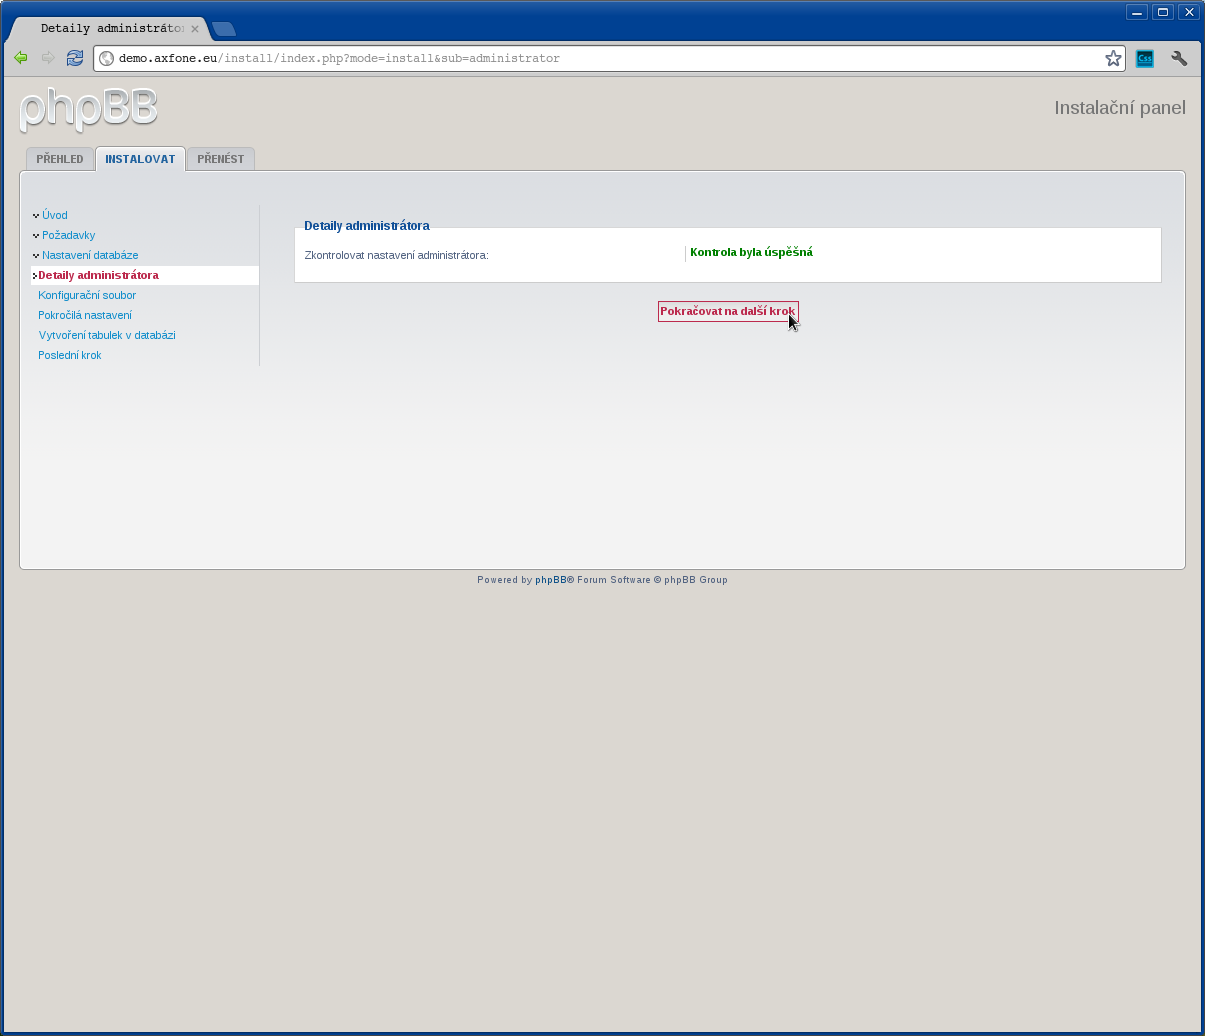
Should check the comparability of the data entered. After she finished, continue pressing "proceed to the next step."
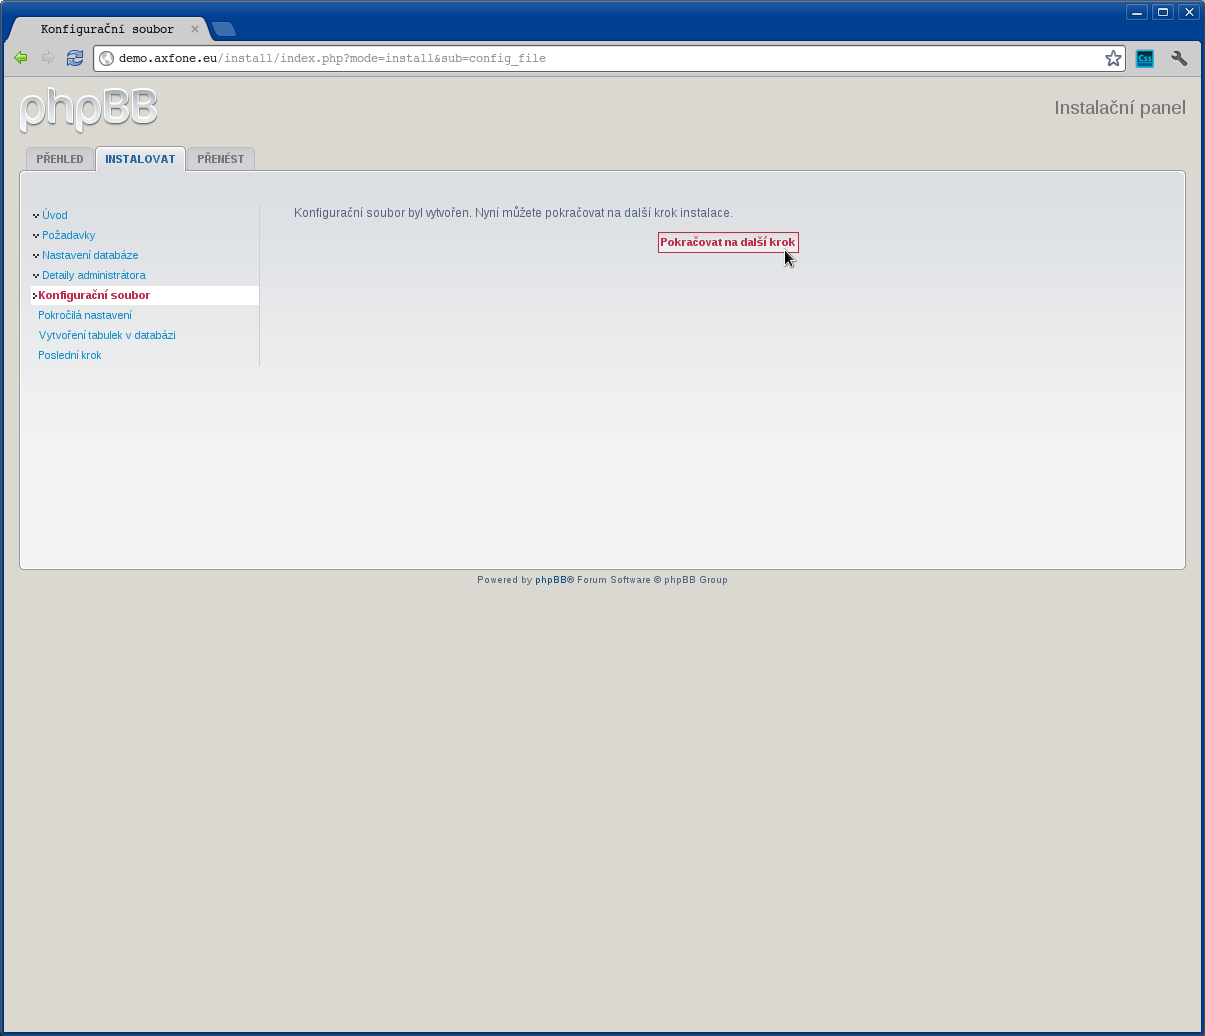
Confirm created configuration file by clicking "proceed to the next step."
Now the installer ask for data to be sent email and data settings on our website. In most cases there is no need to change anything. Continue pressing "proceed to the next step."
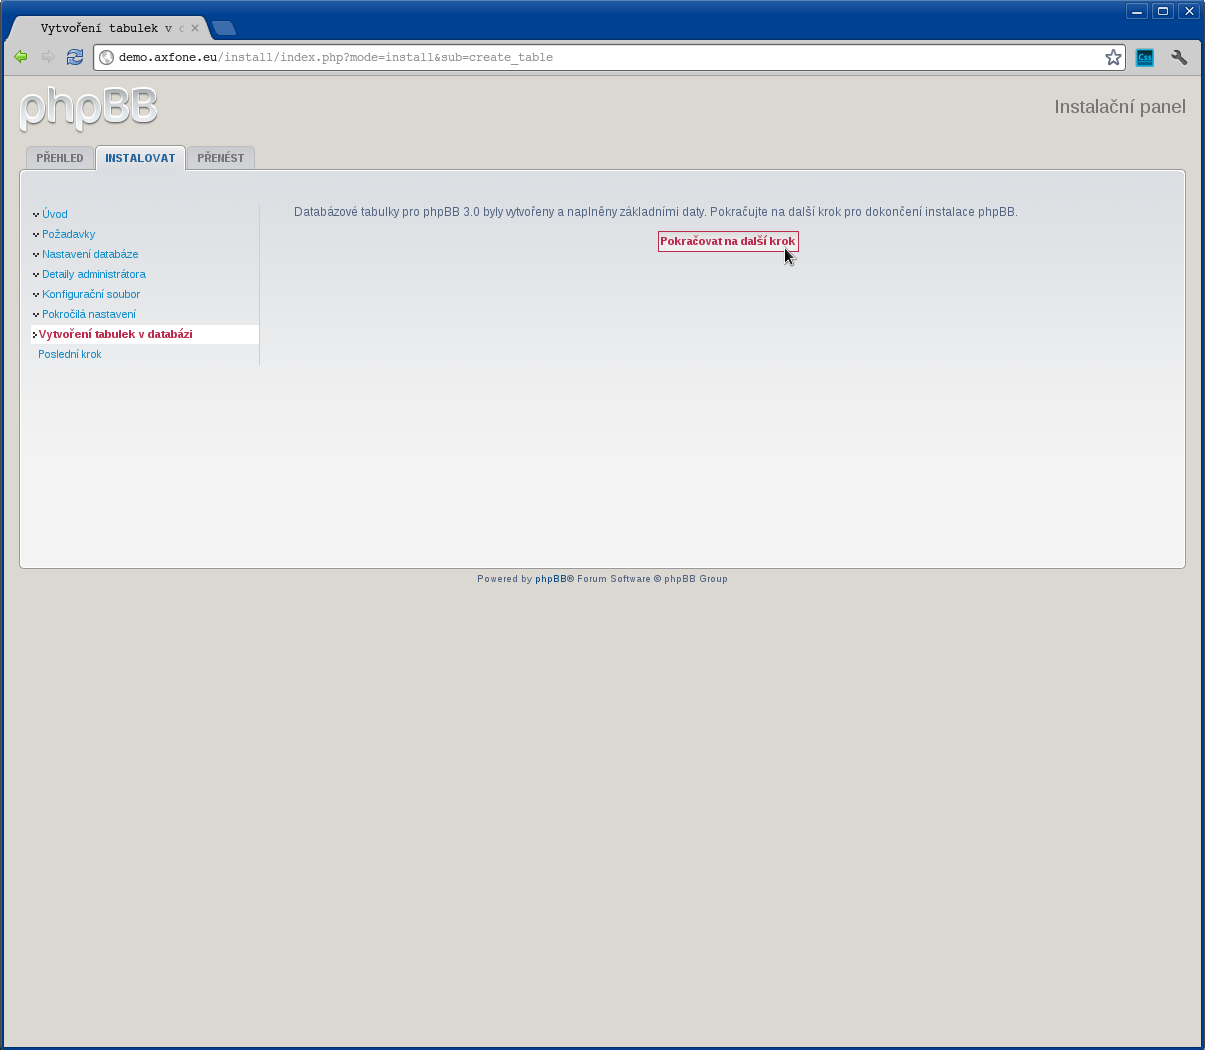
Confirm with the installer creation of tables in the database by clicking "proceed to the next step."
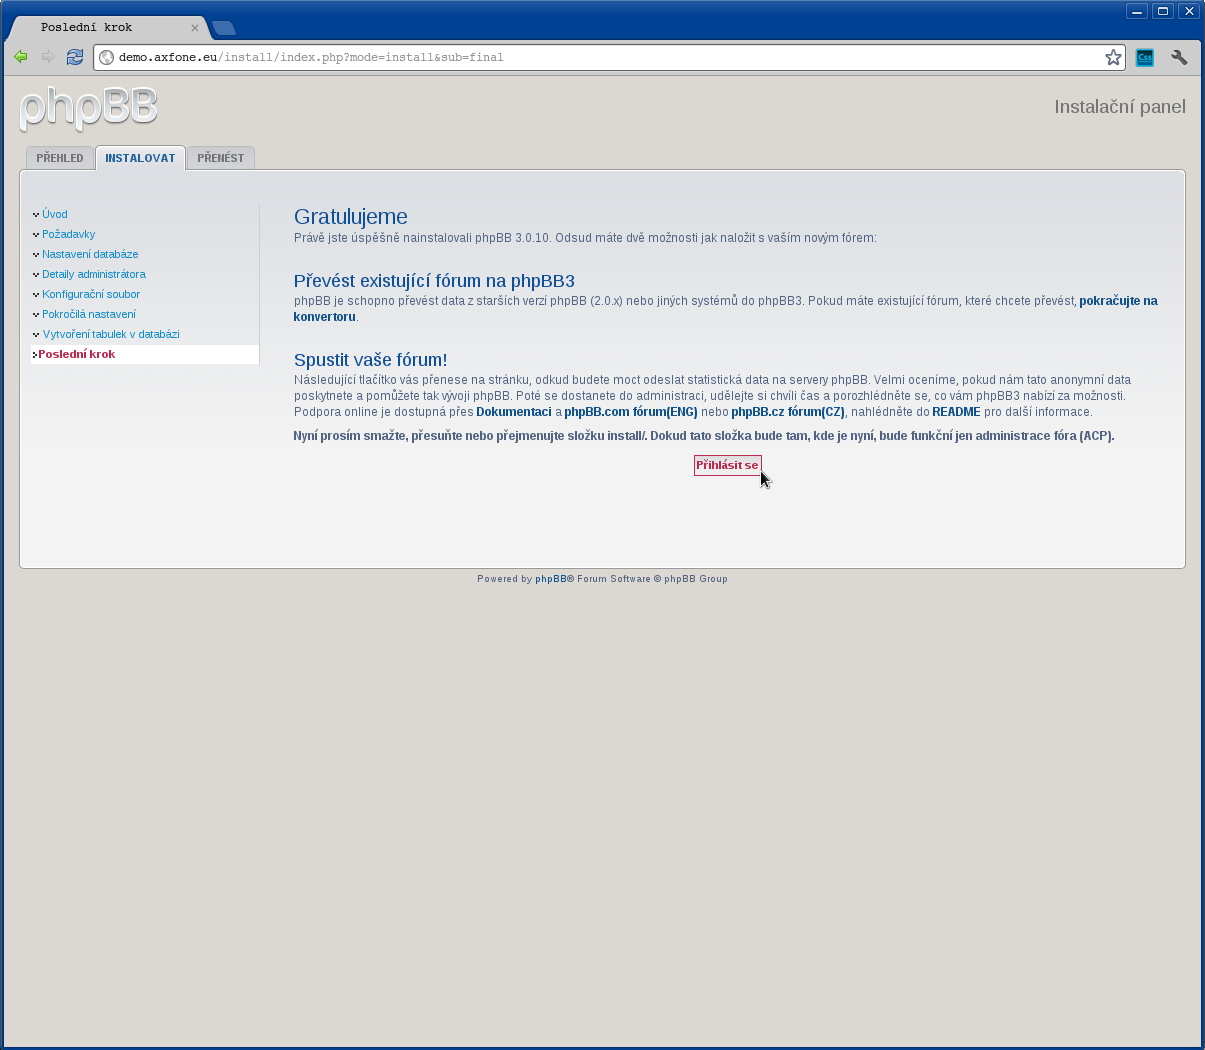
The phpBB system installation is completed. To make other settings, press "Enter".
Zen Cart
Preparing to install a system for content management
First, you need to install the installation package Zen Cart in your site. The installation package can be downloaded from here http://www.zen-cart.org.pl . Furthermore, it needs to prepare the database for trade data and enter the login. Our customers have the opportunity to create their own databases. Mozhe become at admin.waszadomena.xy
After placing the installation package, go to your website where you can install the system. You can see an example of this here: demo.axfone.eu
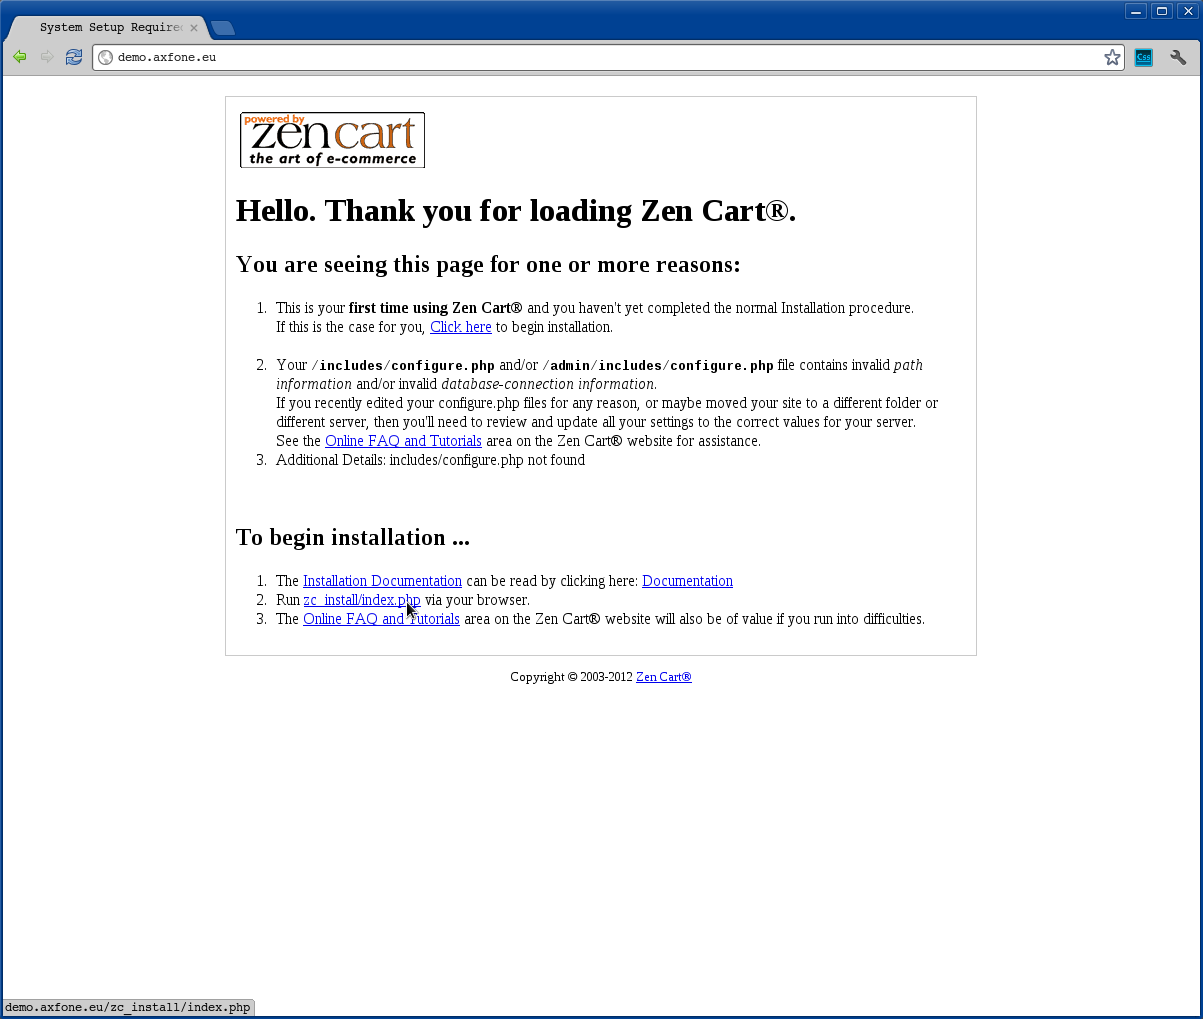
To begin the installation, click "Run zc_install / index.php via your browser." At the bottom of the page that appears.
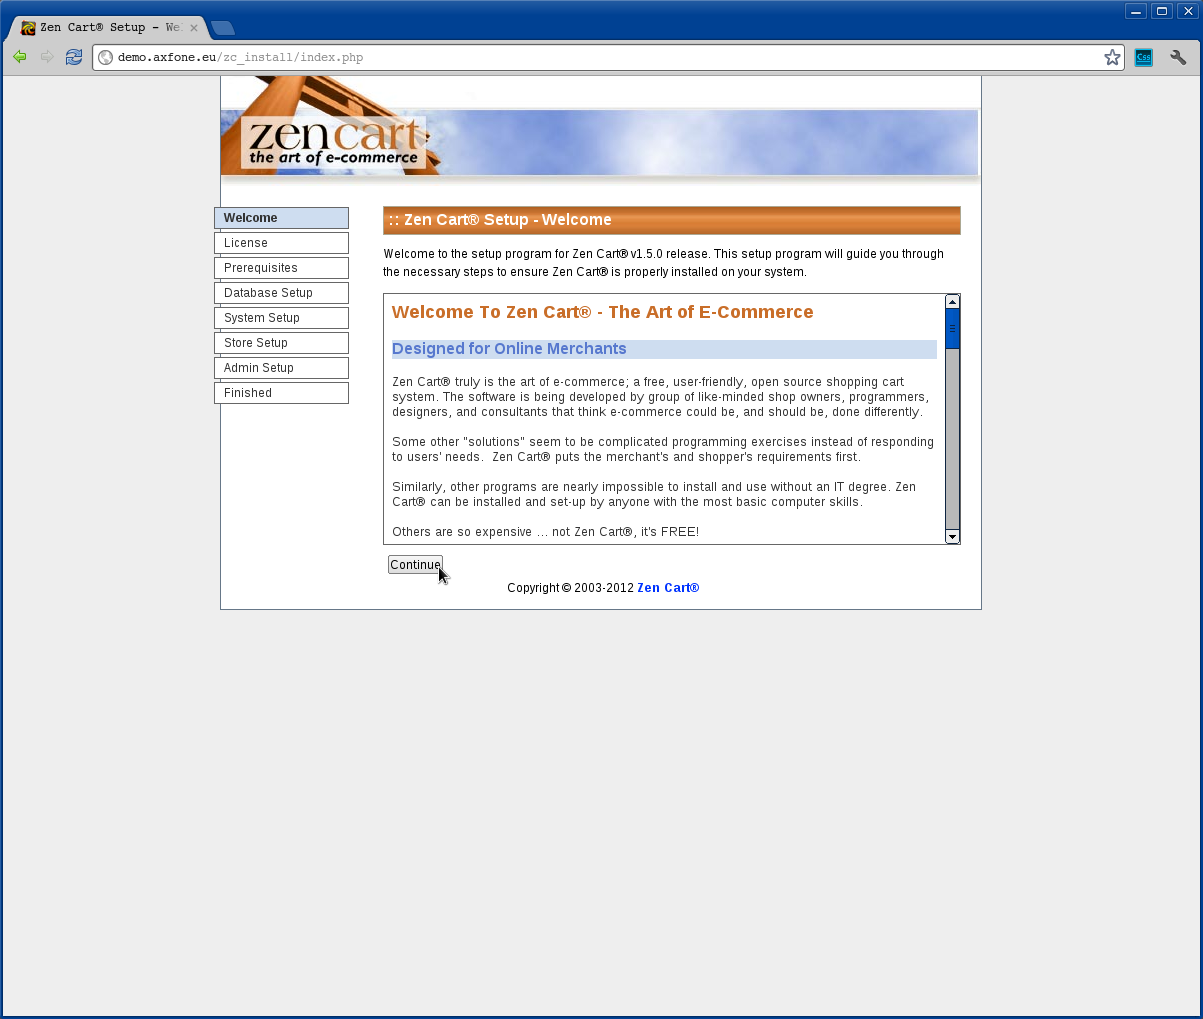
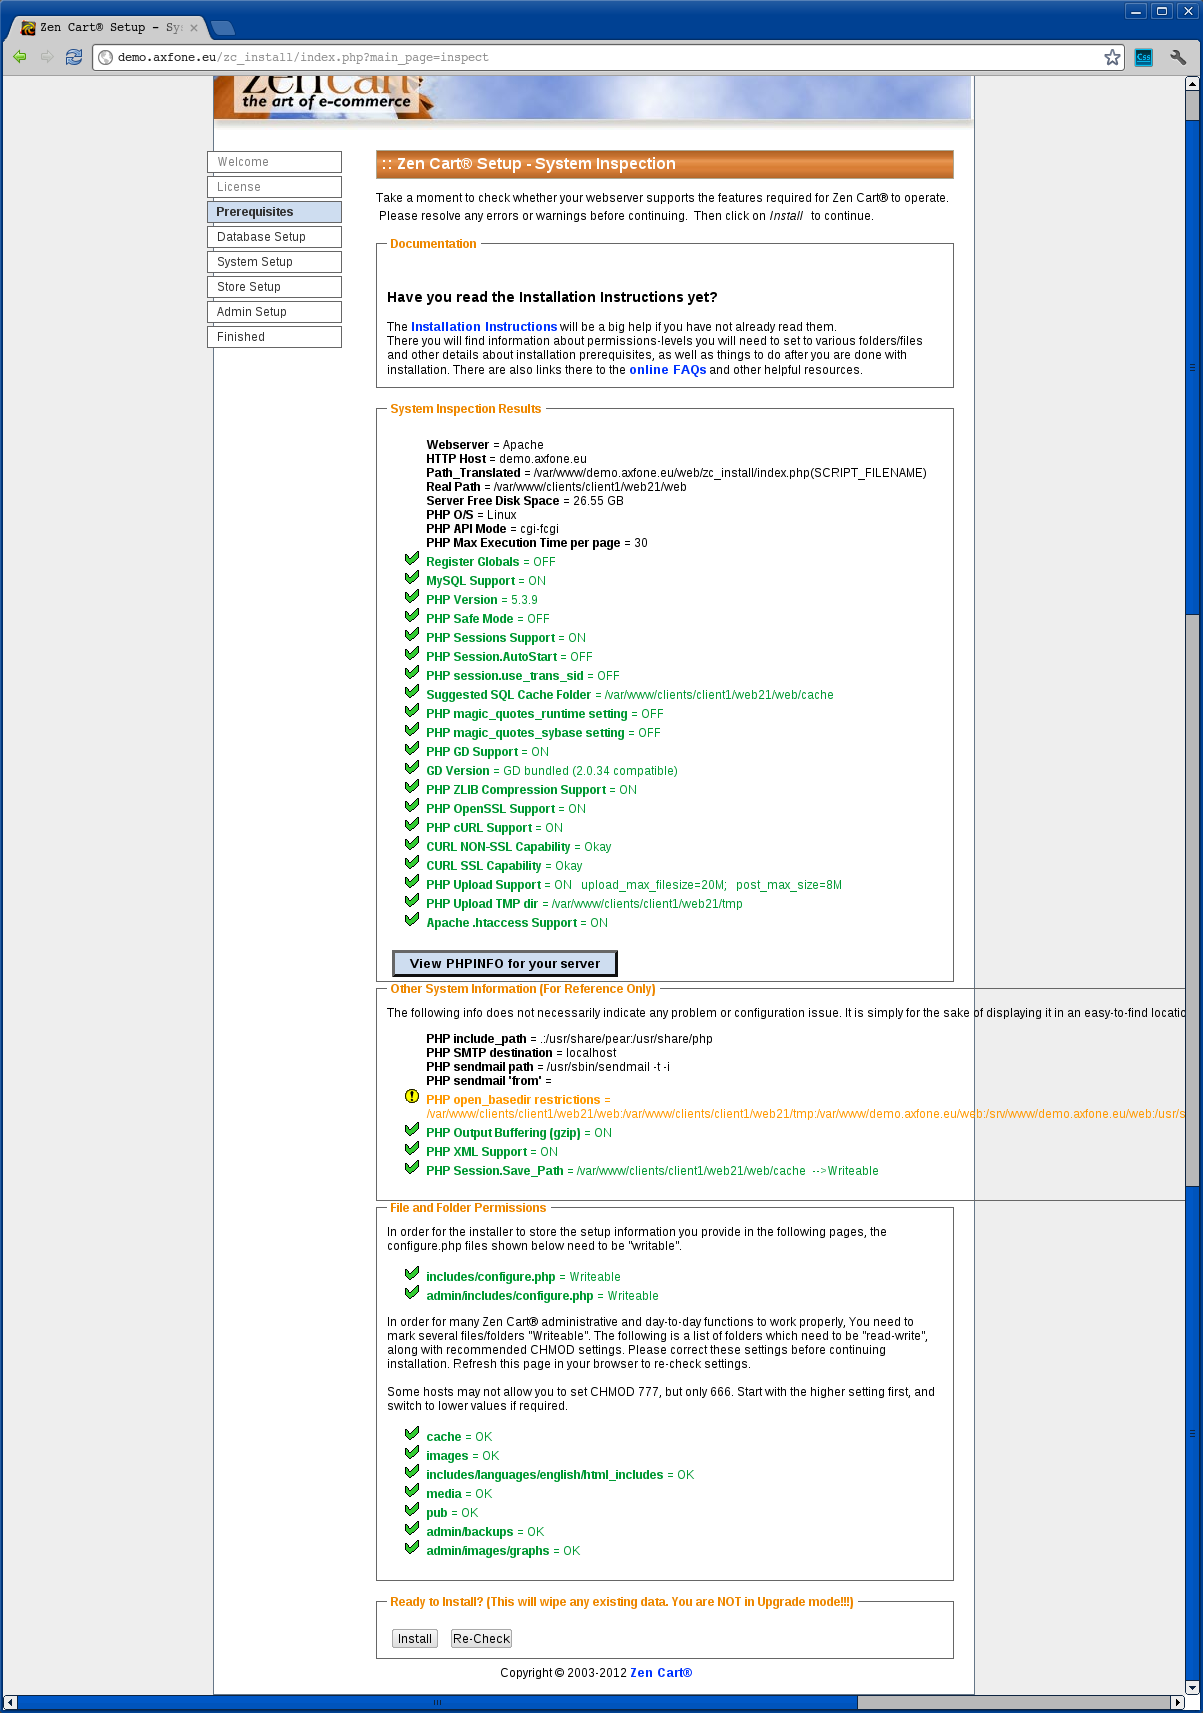
The first page contains various information about the program and its system requirements. To continue, click "Continue".
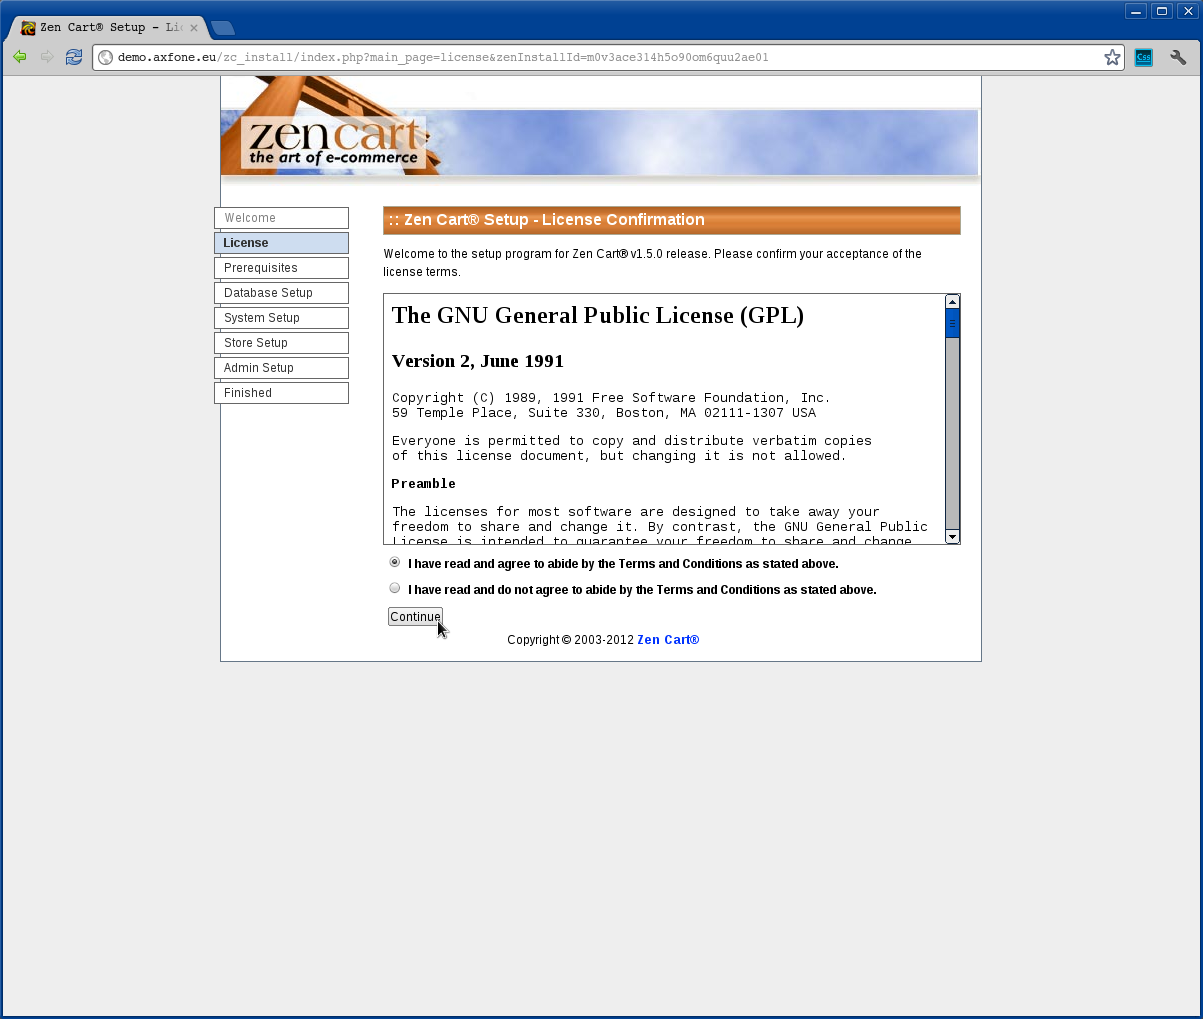
The second page contains information about the license GNU GPL. If you are not familiar with this license, select "I have read and agree to the terms and conditions set out above." and proceed to click "Continue."
At this stage, you must provide the necessary information to connect to the database.
Fill out this way:
Database host: myslq.axfone.eu
( only in the case of the example installation )
Database user: 1_demo
( enter the user name of the database)
Password database: *****
( enter the password for the database)
Database name: 1_demo
( fill in name of the database, where it will be installed ZenCart-s )
The other elements remain in the default settings.
To continue, please click "Save settings database"
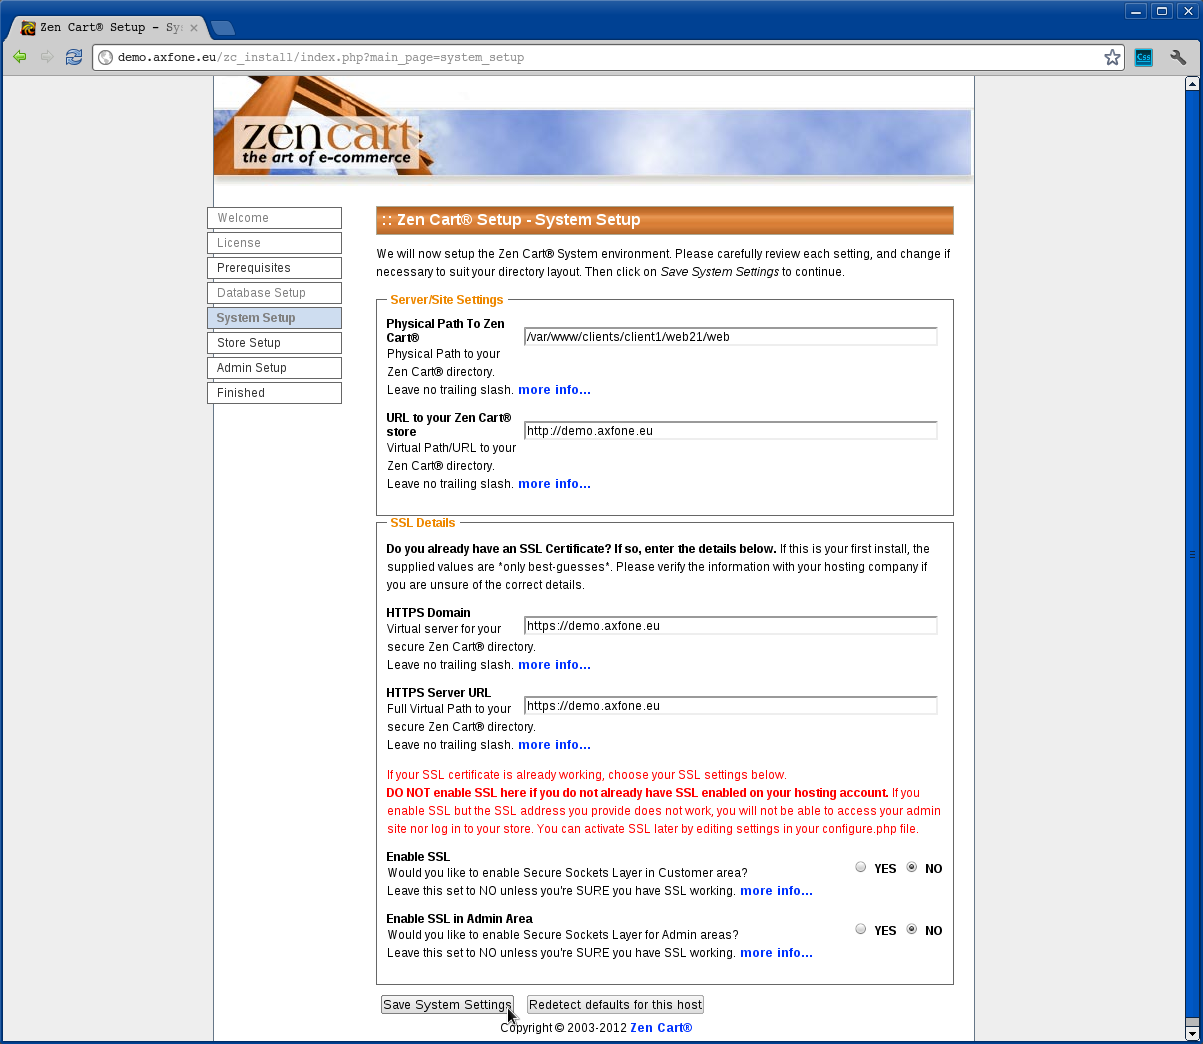
In this step, please check the settings of your web site. Pay special attention to the way Web pages server settings / site. It is also able to access using SSL for Internet and for the administration of your site (T Enable Enable SSL and SSL in Admin Area). If you choose this option, be sure to allow the option SSL support in the administration of your website.
Continue pressing "Save System Settings".
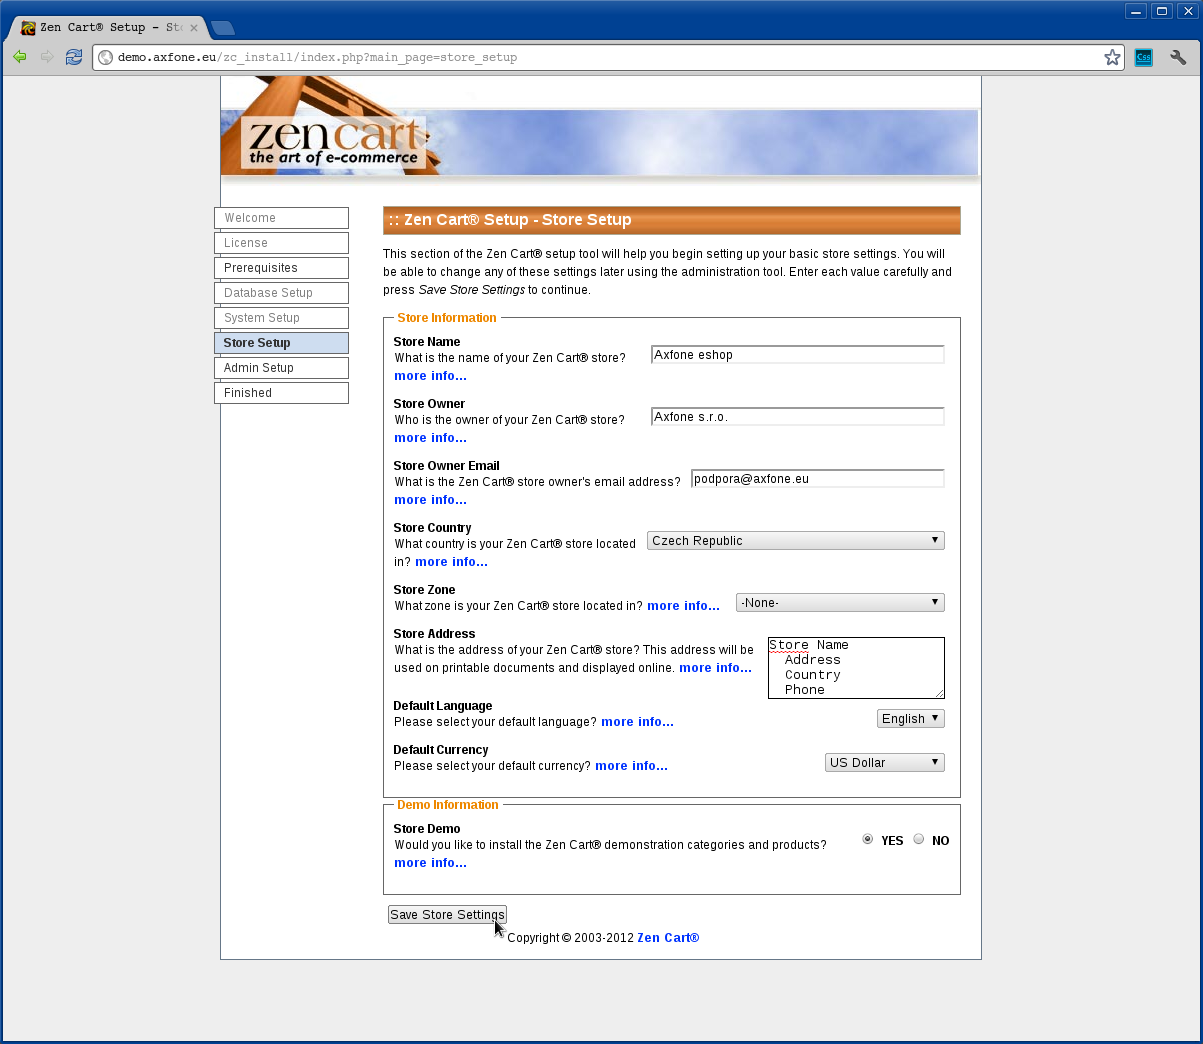
The installer now gather information about the company.
Fill them up in the following way:
Name waded online: Axfone eshop
( the name of your store)
Shop owner: Axfone s.r.o
( the name of the store owner)
Email: This email address is being protected from spambots. You need JavaScript enabled to view it.
( email address of the owner of the shop )
Country: Czech Republic
( country. Installation of the sample)
Area stores: -None-
( from the menu, select -none- )
Store Address:
( Enter address and phone number)
Default language: English
( set as default )
The default currency: Euro
( Currency. Installation example )
Demo Store: Yes
( If you want to fill the store after installing the sample data, select Yes )
After entering the necessary data continue by pressing the "Save Settings Recorded".
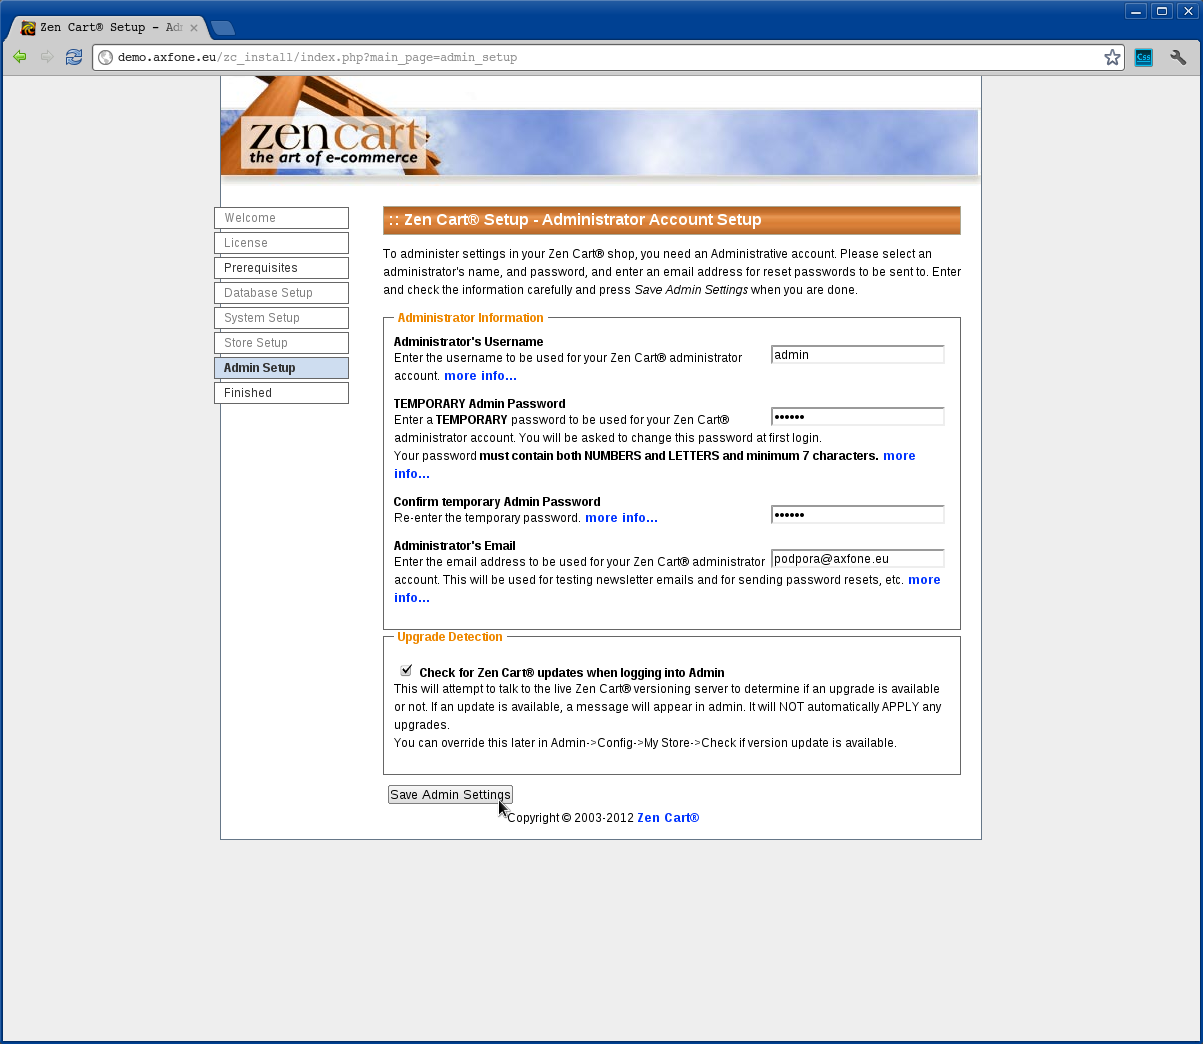
In this step, you will create a commercial profile
Fill it out in this way:
Username administrator: admin
( test installation)
TEMPORARY administrator password: *****
( fill in the password for entry into the admin interface Zen Cart. This is just a temporary password when you first log in to the administration which will be prompted for change )
Confirm temporary administrative password: ****
( confirm the password )
Email of the administrator: This email address is being protected from spambots. You need JavaScript enabled to view it.
( contact details of the administrative shop )
To continue, click "Save settings Admin".
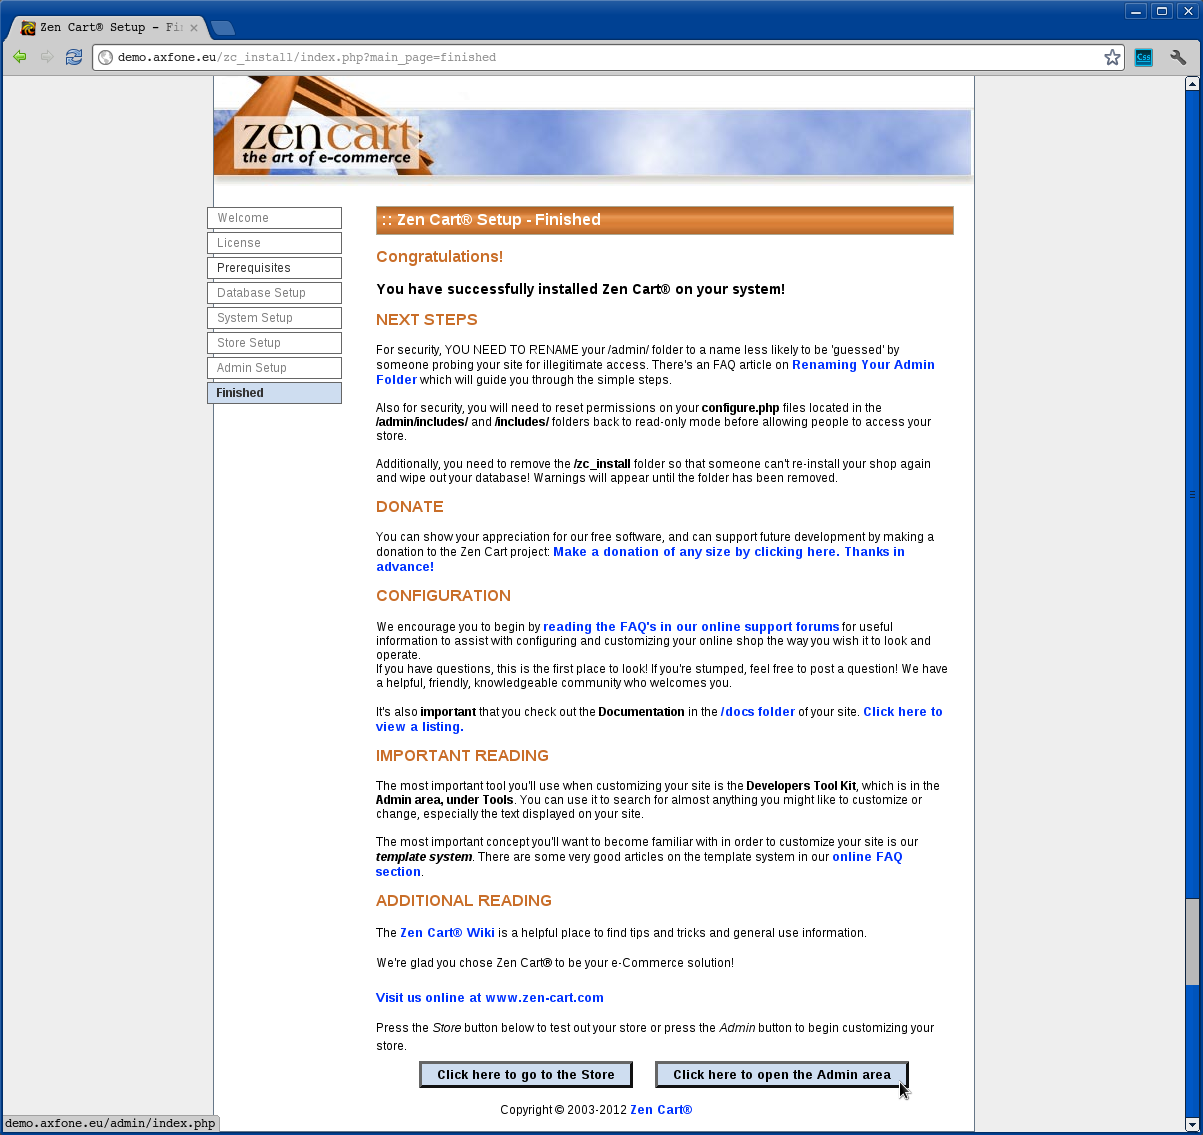
The Installation of Zen Cart is completed. If you want to make additional settings you must be logged in as an administrator, waszadomena.tld / admin ( in our example this is demo.axfone.eu/admin )